Quickstart
This quickstart guide tells in brief how to install the plugin and start capturing leads from you site directly into Dynamics 365.
Installation
Go to Plugins > Add New in your WordPress administration panel. Type "Dynamics 365 Integration" into the "Search Plugins..." text field. After the plugin is found, click "Install Now", then click "Activate" after the plugin is installed.

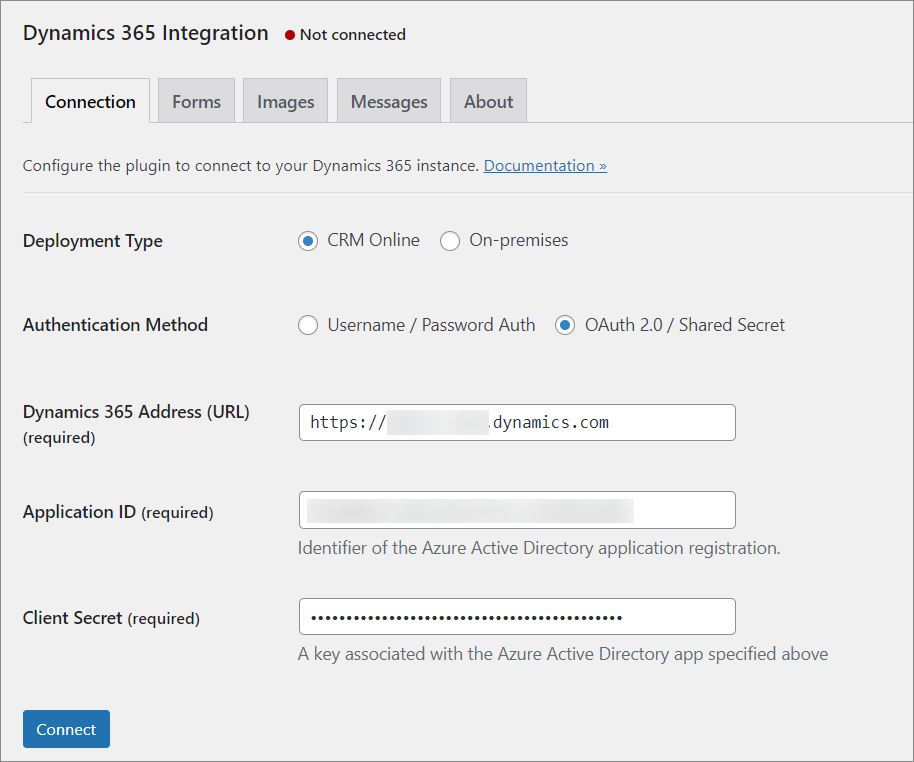
Once the plugin is activated, go to Dynamics 365 > Connection and configure the connection to your Dynamics 365 instance. Plugin supports two authentication methods: App Id/Client Secret (Online only) and Username/Password (Online and On-Premises).
Note: Username/Password authentication has been deprecated for Online deployments and will be removed in April 2022.
App Id / Client Secret authentication
Choose the CRM Online deployment type. Enter the URL of your Dynamics 365 organization, and specify app id and client secret to access your Dynamics 365 instance.
If you do not have app id/secret ready then you need to complete the following steps:
- Register an app in Microsoft Entra ID. During the registration select Accounts in this organizational directory only as Supported account types. Stop the walkthrough after the step when the app is registered, do not add redirect URI or change platform settings. Copy Application (client) ID and set aside.
- Add client secret credentials. Copy client secret and set aside.
- Create an application user in Dataverse by following these instructions. Make sure to assign roles to the user.
- Use application id and client secret in the plugin configuration dialog.
This knowledge base article contains step-by-step instructions and screenshots to guide you through the process.
Username / Password authentication
Once the plugin is activated, go to Dynamics 365 > Connection and configure the connection to your Dynamics 365 instance. Choose the appropriate deployment type, CRM Online or On-premises. Enter the URL of your Dynamics 365 organization, and specify user name and password to access your Dynamics 365 instance.

After connecting to Dynamics 365 you should see the message "Connected to <Your Organization Name>".
You can find more information about connection settings at the Configuration documentation page
Surface a Dynamics 365 form in WordPress
Let's surface a form from your Dynamics 365 organization using the Dynamics 365 Integration plugin.
Creating a form in Dynamics 365
You can create a new custom form in Dynamics 365 or use an existing one. If you want to use an existing form you can skip this section.
To create a new form first open the Solution Explorer window with you desired solution or the default solution. For more information about solutions please refer to Dynamics 365 Solutions documentation.

In Solution Explorer navigate to Components > Entities section and choose the desired entity, for example, Contact. Expand the selected entity node and select Forms. Click the New button and select the desired form type. For more information about form types please see Create and design forms.

Now you can create and save the new form using the form editor. For more information about the form editor please see Form editor documentation.
Please don't forget to specify the name of your custom form and publish it.
Adding a form to a page
Create a new page in your WordPress administration panel by navigating to Pages > Add new or open an existing one from Pages > All pages menu section. Don't forget to enter page title if it's a new page.
Switch the content editor mode to plain text by clicking on the Text tab. Finally insert the following code into the editor:
[msdyncrm_twig]
{% form entity="contact" name="WordPress Example Form" mode="create" %}{% endform %}
[/msdyncrm_twig]
In create mode the form will create a new record in CRM.

Click Publish button on the right sidebar to publish your new page or Update button if you are editing an existing page.
Now you should see your form on a website page. This form will submit new contacts directly to Dynamics 365.

You can find more information about creating forms at the Twig Templates documentation page
Surface Dynamics 365 records in WordPress
Now let's surface some information from your Dynamics 365 organization using the Dynamics 365 Integration plugin.
Creating a view in Dynamics 365
To surface information from Dynamics 365 on your website you can use System Views as well as Personal Views. Let's create a new Personal View for demonstration purpose. If you want to use an existing view you can skip this section.
To create a new Personal View first open an existing System View of some entity, for example, Active Contacts and when click Advanced Find button on the top panel to open the Advanced Find window. Now you can create new Personal View and save it with some specified name, for example 'Filtered Contacts'.

Please note that personal views must be shared with the user you use to connect WordPress to Dynamics 365 before you start surfacing them on your website. To achive this click Saved Views on the toolbar, select the view you just created, and click Share button. The mentioned user must have read access to view in order to surface it in WordPress.
For more information about creating and editing Views in Dynamics 365 please refer to Dynamics 365 Views documentation.
Adding a view to a page
Create a new page in your WordPress administration panel by navigating to Pages > Add new or open an existing one from Pages > All pages menu section. Don't forget to enter page title if it's a new page.
Switch the content editor mode to plain text by clicking on the Text tab, and insert the following code into the editor:
[msdyncrm_twig]
{% view entity="contact" name="Filtered Contacts" count="10" cache="PT60M" %}{% endview %}
[/msdyncrm_twig]
We added count parameter to enable result pagination and limit the number of records per page to 10, and cache parameter to store retrieved data in site cache for 1 hour.

Click Publish button on the right sidebar to publish your new page or Update button if you are editing an existing page.
Now you should see retrieved data from Dynamics 365 on a website page.

You can find more information about creating views at the Twig Templates documentation page
Entity Binding
You can also bind CRM entities to WordPress pages dynamically by using Entity data binding functionality.. These bindings can be set automatically with default Twig-templates, by using the Set default for views option, or you can override the default template to create links between pages manually. First, we will create an automatically binding between the two previously created pages, with a list of contacts and a new cotact form.
Surfacing record using default page binding
Open the page where the contact form is located and setup a binding to the Contact entity, as shown in the screenshot below. Select the Contact entity from the drop-down list and select checkbox Set default for views. After that change the form tag in Content text field as follows:
[msdyncrm_twig]
{% form entity="contact" name="WordPress Example Form" mode="edit" record=currentrecord %}{% endform %}
[/msdyncrm_twig]

Thereby, we just linked the form on this page with the Contact entity from Dynamics 365 instance and specify that this page should be used as the default page for displaying Contact entity records for the entire site. Note that for each entity only one default page can be set, i.e. if we checked the Set default for views checkbox on the current page, then for all other pages with the Contact entity binding it will be deactivated.
Also, we specify that form on this page should display the fields of the record of the binded entity (in this case it is Contact) and the id of the selected record is passed by the url-parameter id.
Now return to the page of the site where we placed a list of contacts, you should see that each entry now has a link that way you you to a page with a contact form, where the fields are already filled with data of the selected record. If you edit the form and submit it, selected record's data will be sent to Dynamics 365 application. All this will be done automatically, only with the use of the pre-defined tags.

Surfacing record using custom view template
You can also specify your own custom template for view to customize the displaying of records and provide links to related pages manually.
For example, let's change default table view to more flexible one using this template:
[msdyncrm_twig]
{% view entity="contact" name="Filtered Contacts" count="10" cache="PT60M" %}
<div class="contacts-list">
  {% for recordId, record in entityview.rows %}
    <div class="contacts-row" style="margin: 2em 0;">
      <h4>
        <a href="{{ entityUrl( 'contact', recordId ) }}">{{ record['fullname'].value }}</a>
      </h4>
      {% if record['emailaddress1'].value is not empty %}
        <div>email: {{ record['emailaddress1'].value }}</div>
      {% endif %}
      {% if record['telephone1'].value is not empty %}
        <div>phone: {{ record['telephone1'].value }}</div>
      {% endif %}
    </div>
  {% endfor %}
</div>
{% endview %}
[/msdyncrm_twig]

Here we use entityview.rows variable to loop through all records of Contact entity. To build correct links for each record we use the entityUrl(entityName, recordId) function. More information about aviable variables, filters and functions you can find at the Twig Templates documentation page
Now you can see that layout of contacts list page has been changed according custom template.

Default built-in template for views is located in templates/twig/view.twig within Dynamics 365 Integration installation directory.
You can find more information about Entity data binding at the Entity Binding documentation page