Configure Solution and App
Install Solution
Download the DataPress Event Ticketing solution and install it to your environment with Dynamics 365 Customer Insights.
Dynamics 365 Customer Insights – Journeys provides real-time marketing capabilities to help organizations orchestrate personalized customer journeys across multiple touchpoints.
Previously known as Dynamics 365 Marketing, some customers may still encounter references to 'Marketing' in their environment.
Solution and App Configuration
DataPress Event Ticketing is an unmanaged solution you can modify after importing.
Environment Variable
The CI-J Settings environment variable is used for the administrator to decide whether to automatically create a new WordPress user when the customer is registering for an event. A new WordPress user will only be created if one does not already exist.
By default, new users are not created. To enable this, go to the solution and change the CI-J Settings environment variable value to true:
{"AllowWpUserCreation": true}
The contact email field is used as the WordPress username. This can be changed in the [Events] Form Submitted Power Automate flow
Registration Form
Our solution includes a ready-made custom registration form for convenient data processing.
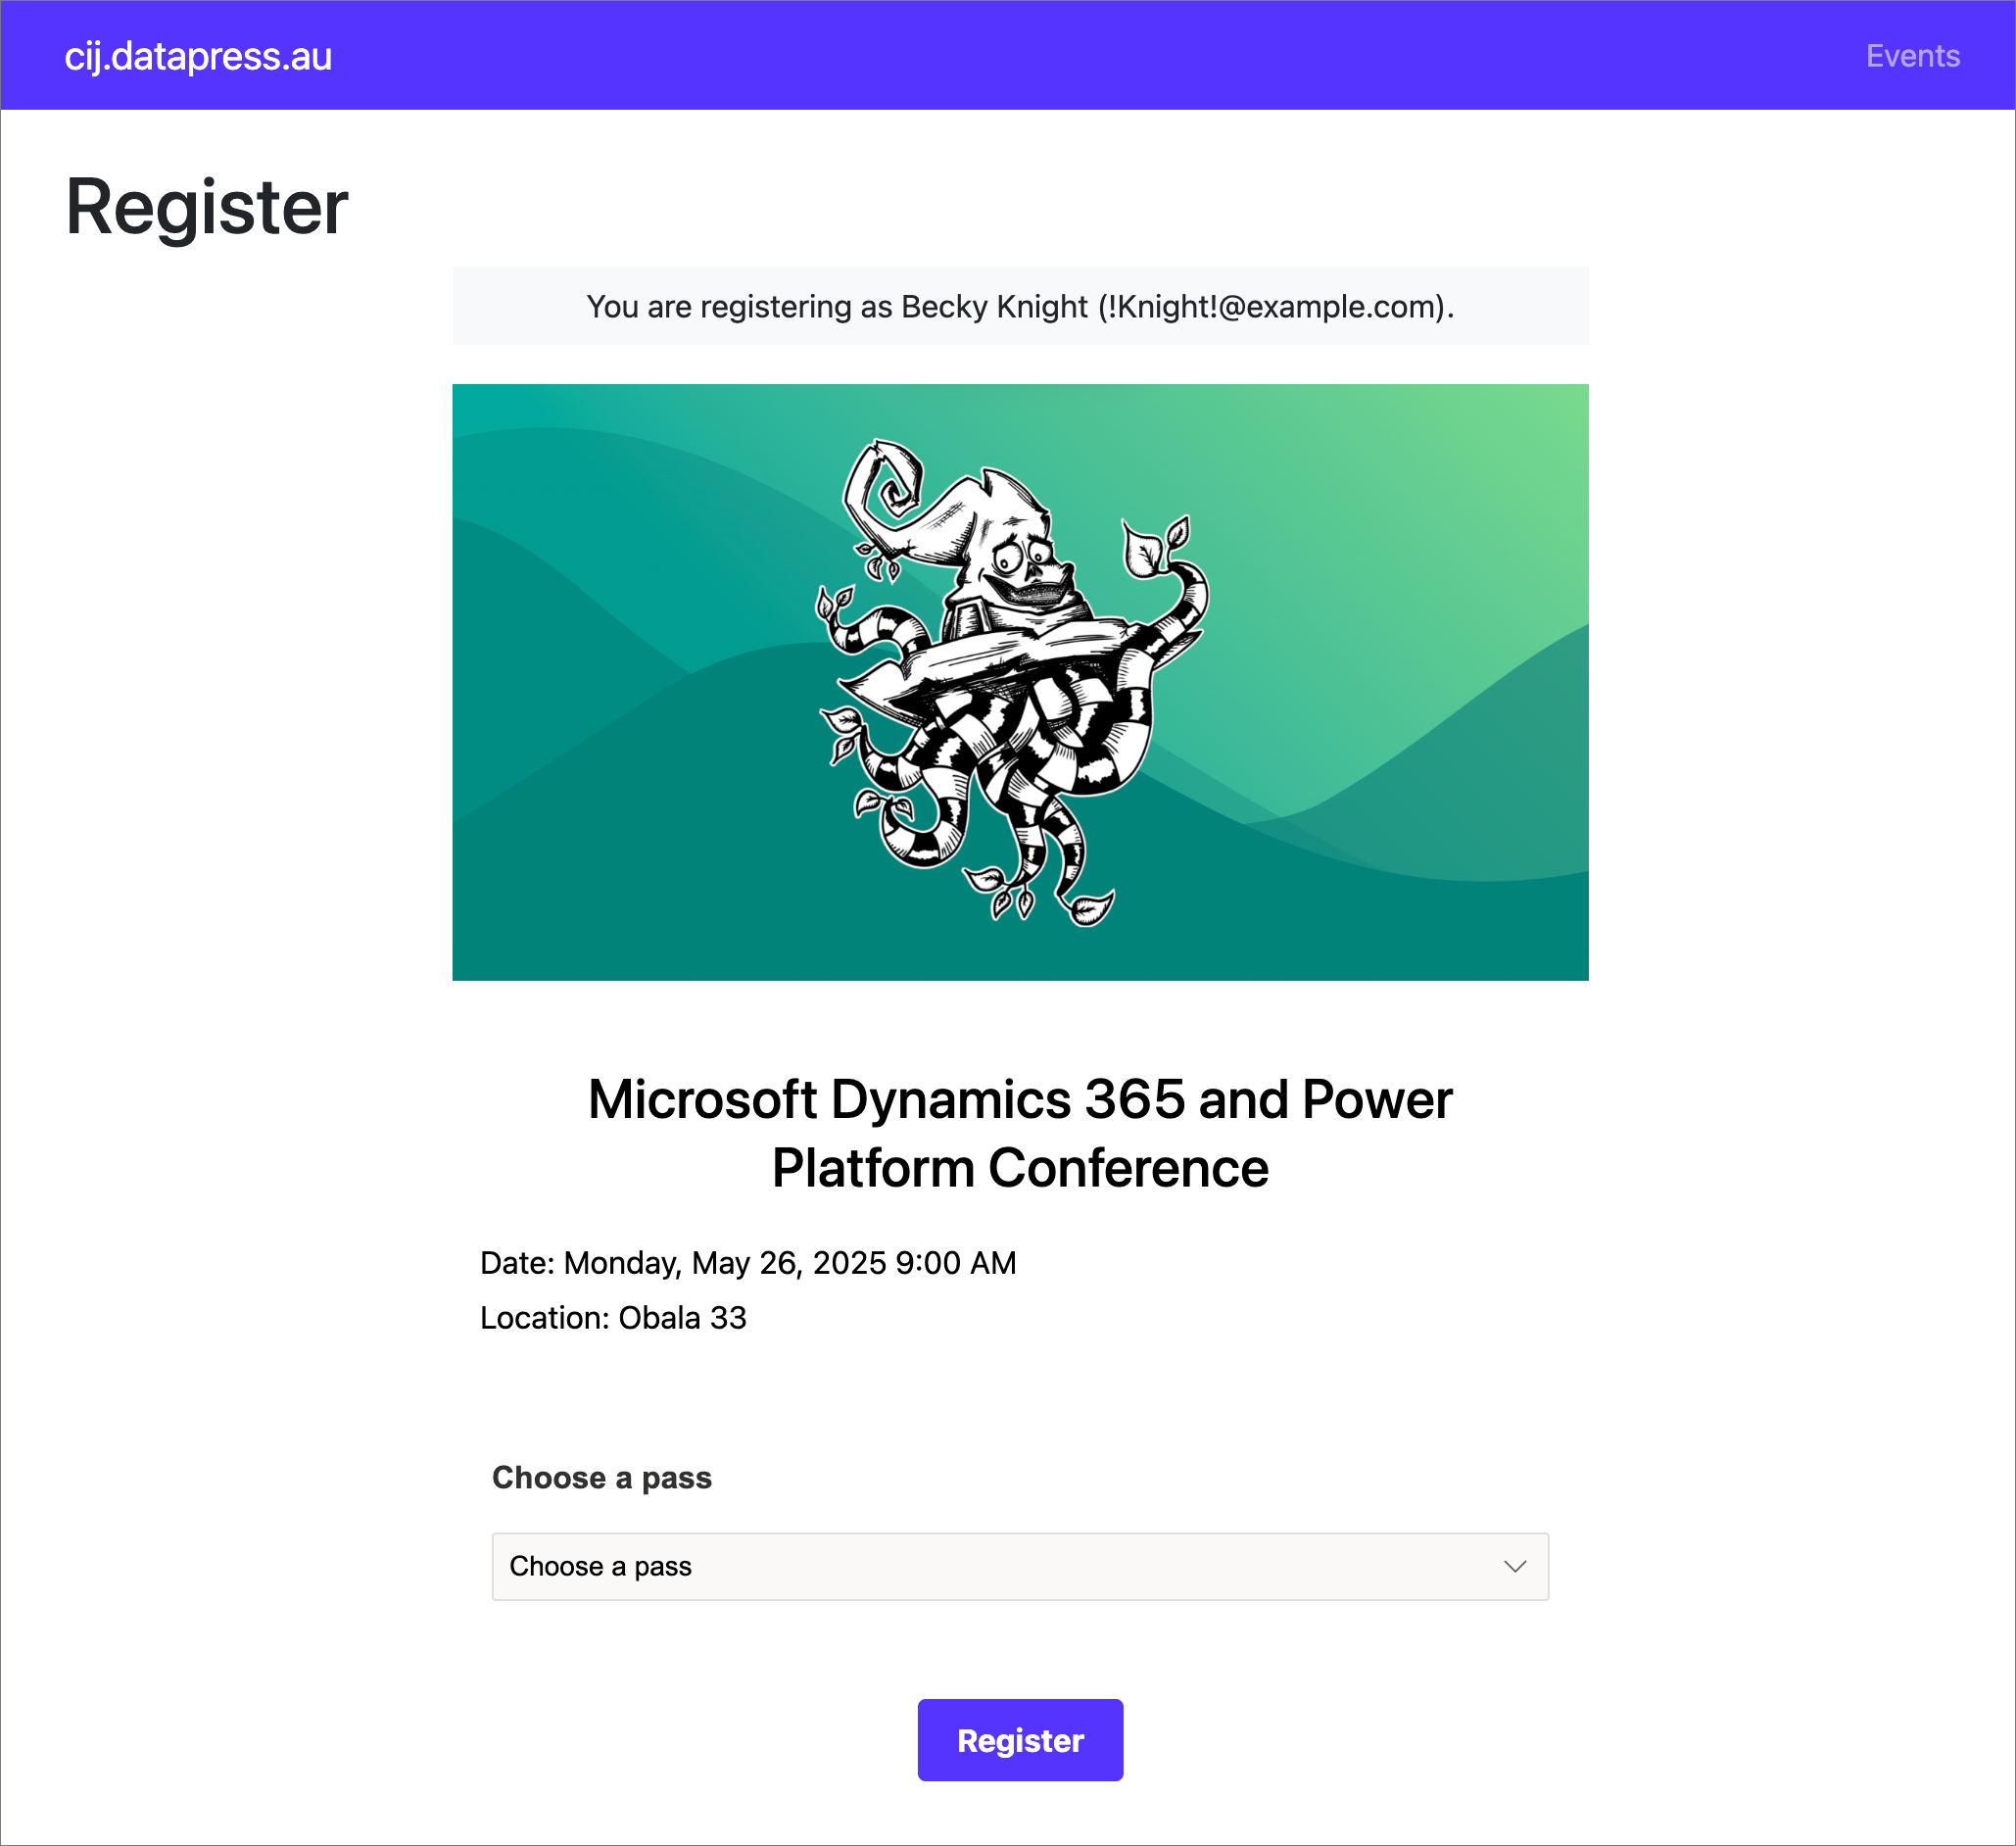
If the customer is a logged-in WordPress user and has a bound contact, the form is automatically populated. It fills in details such as the contact's FirstName, LastName, Email, and other required data. In this case, the customer does not interact with the form fields. Instead, a message confirms their registration details: "You are registering as FirstName LastName (email@example.com)"
To complete the registration, the customer simply clicks the submit button.
If logged in but not bound to a contact, the form pre-fills with WordPress data, allowing review and edits before submission.
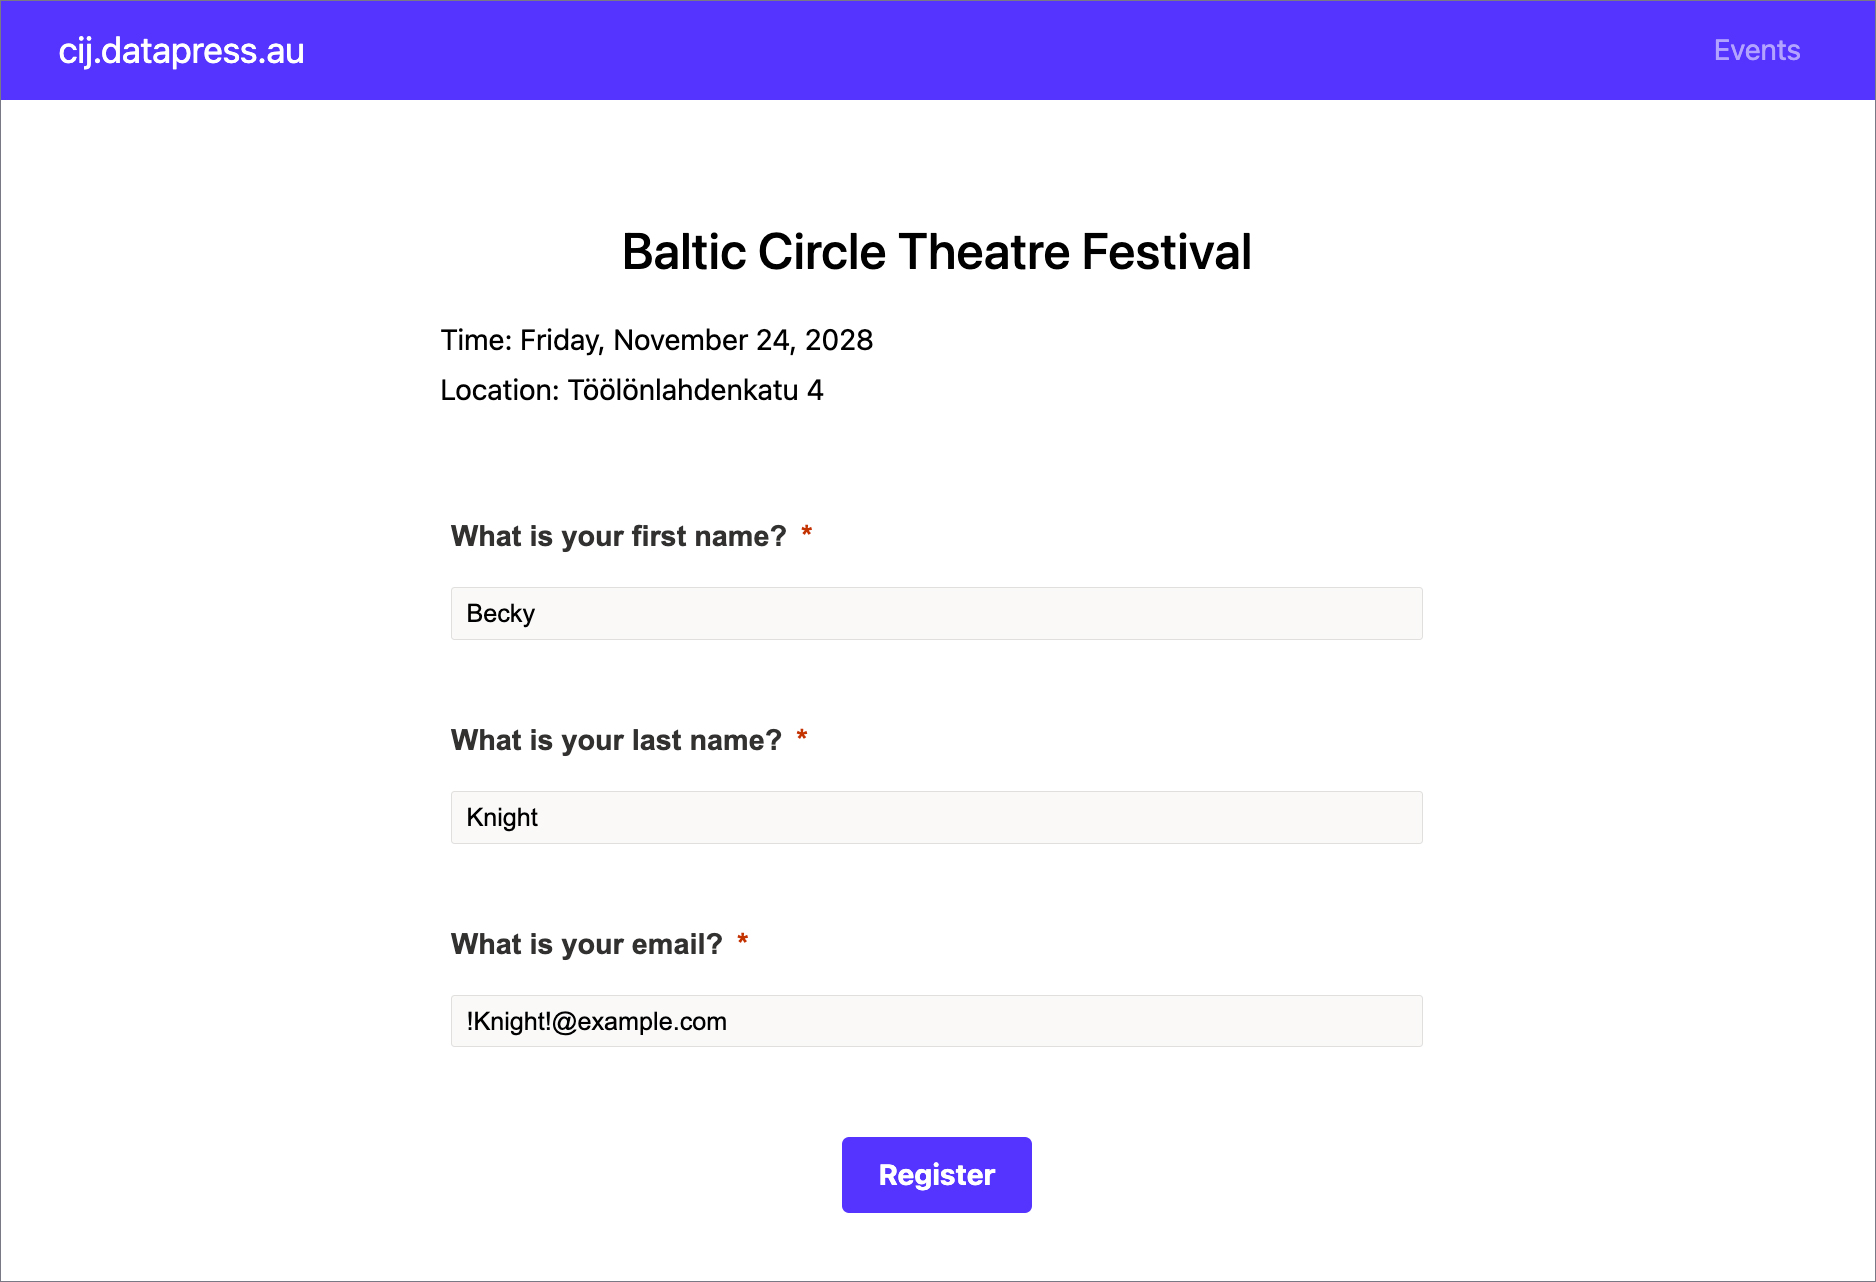
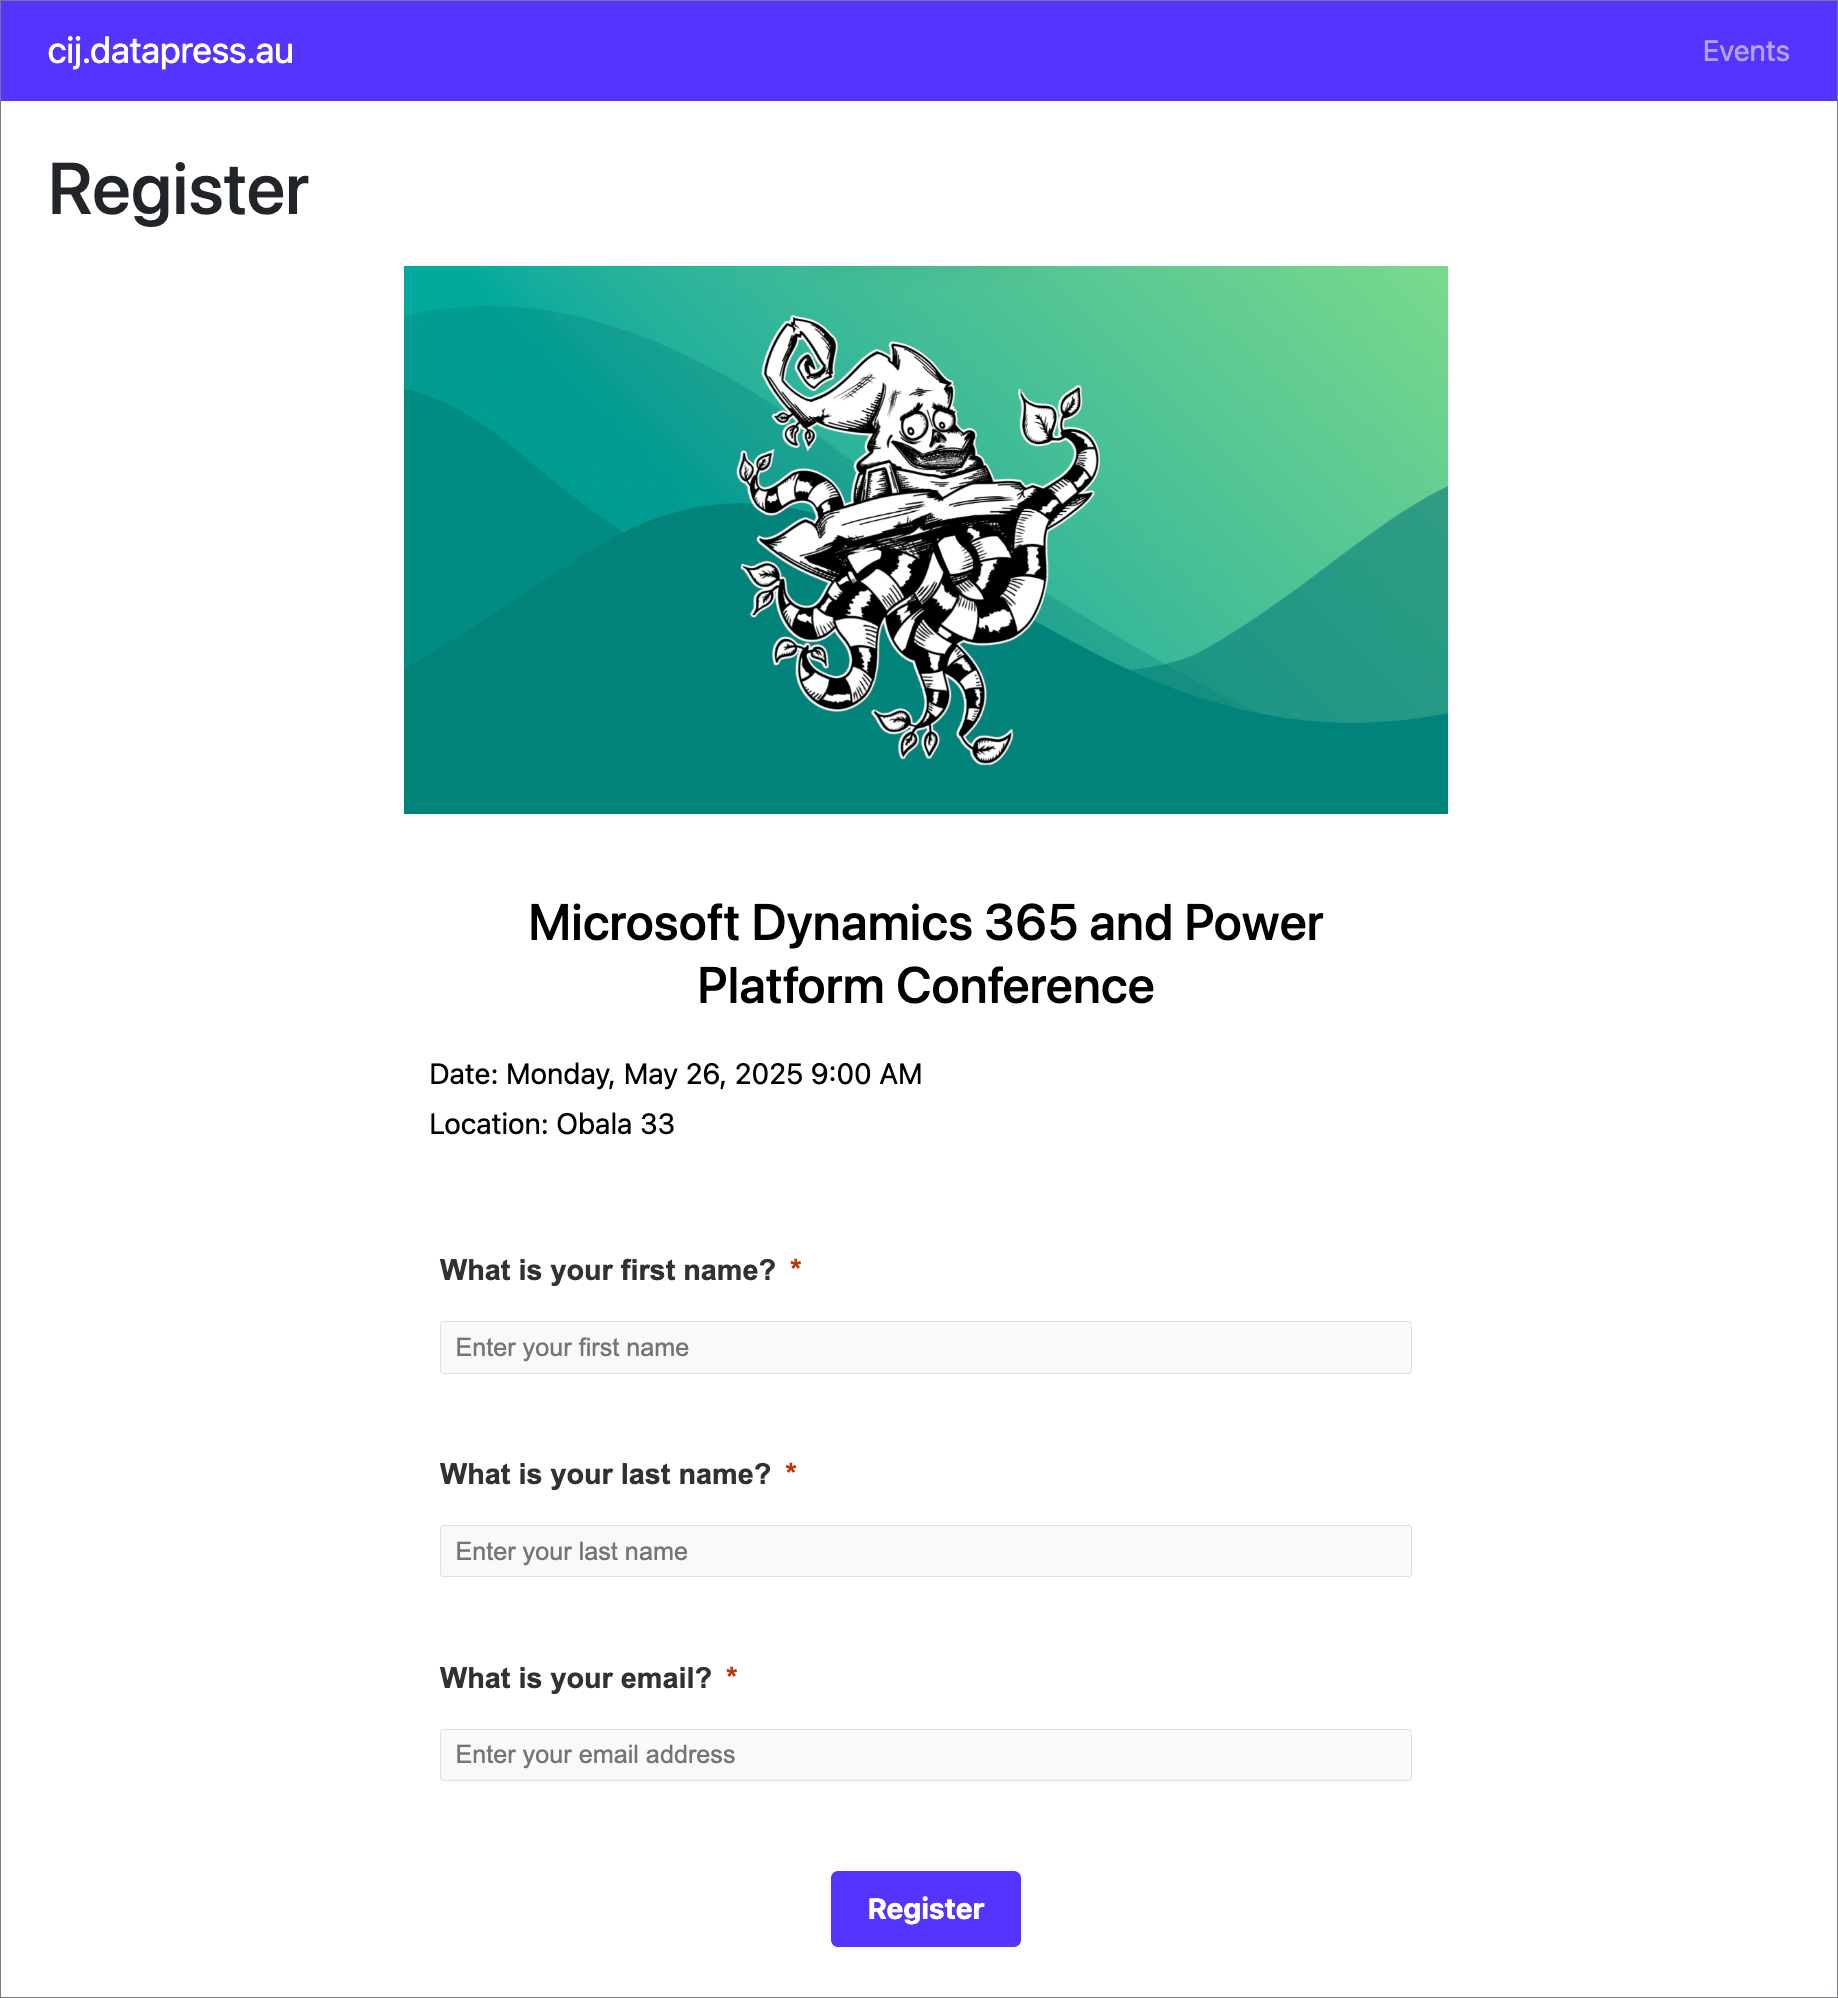
If the WordPress user is not logged in or the contact is not bound, they see a standard form with all fields available for manual input.
Form Settings
You need to use a customized event registration form with some hidden fields.
To create an event registration form, go to the Website and form tab of your event.
When you create a new event, a Default registration form is bound to it.
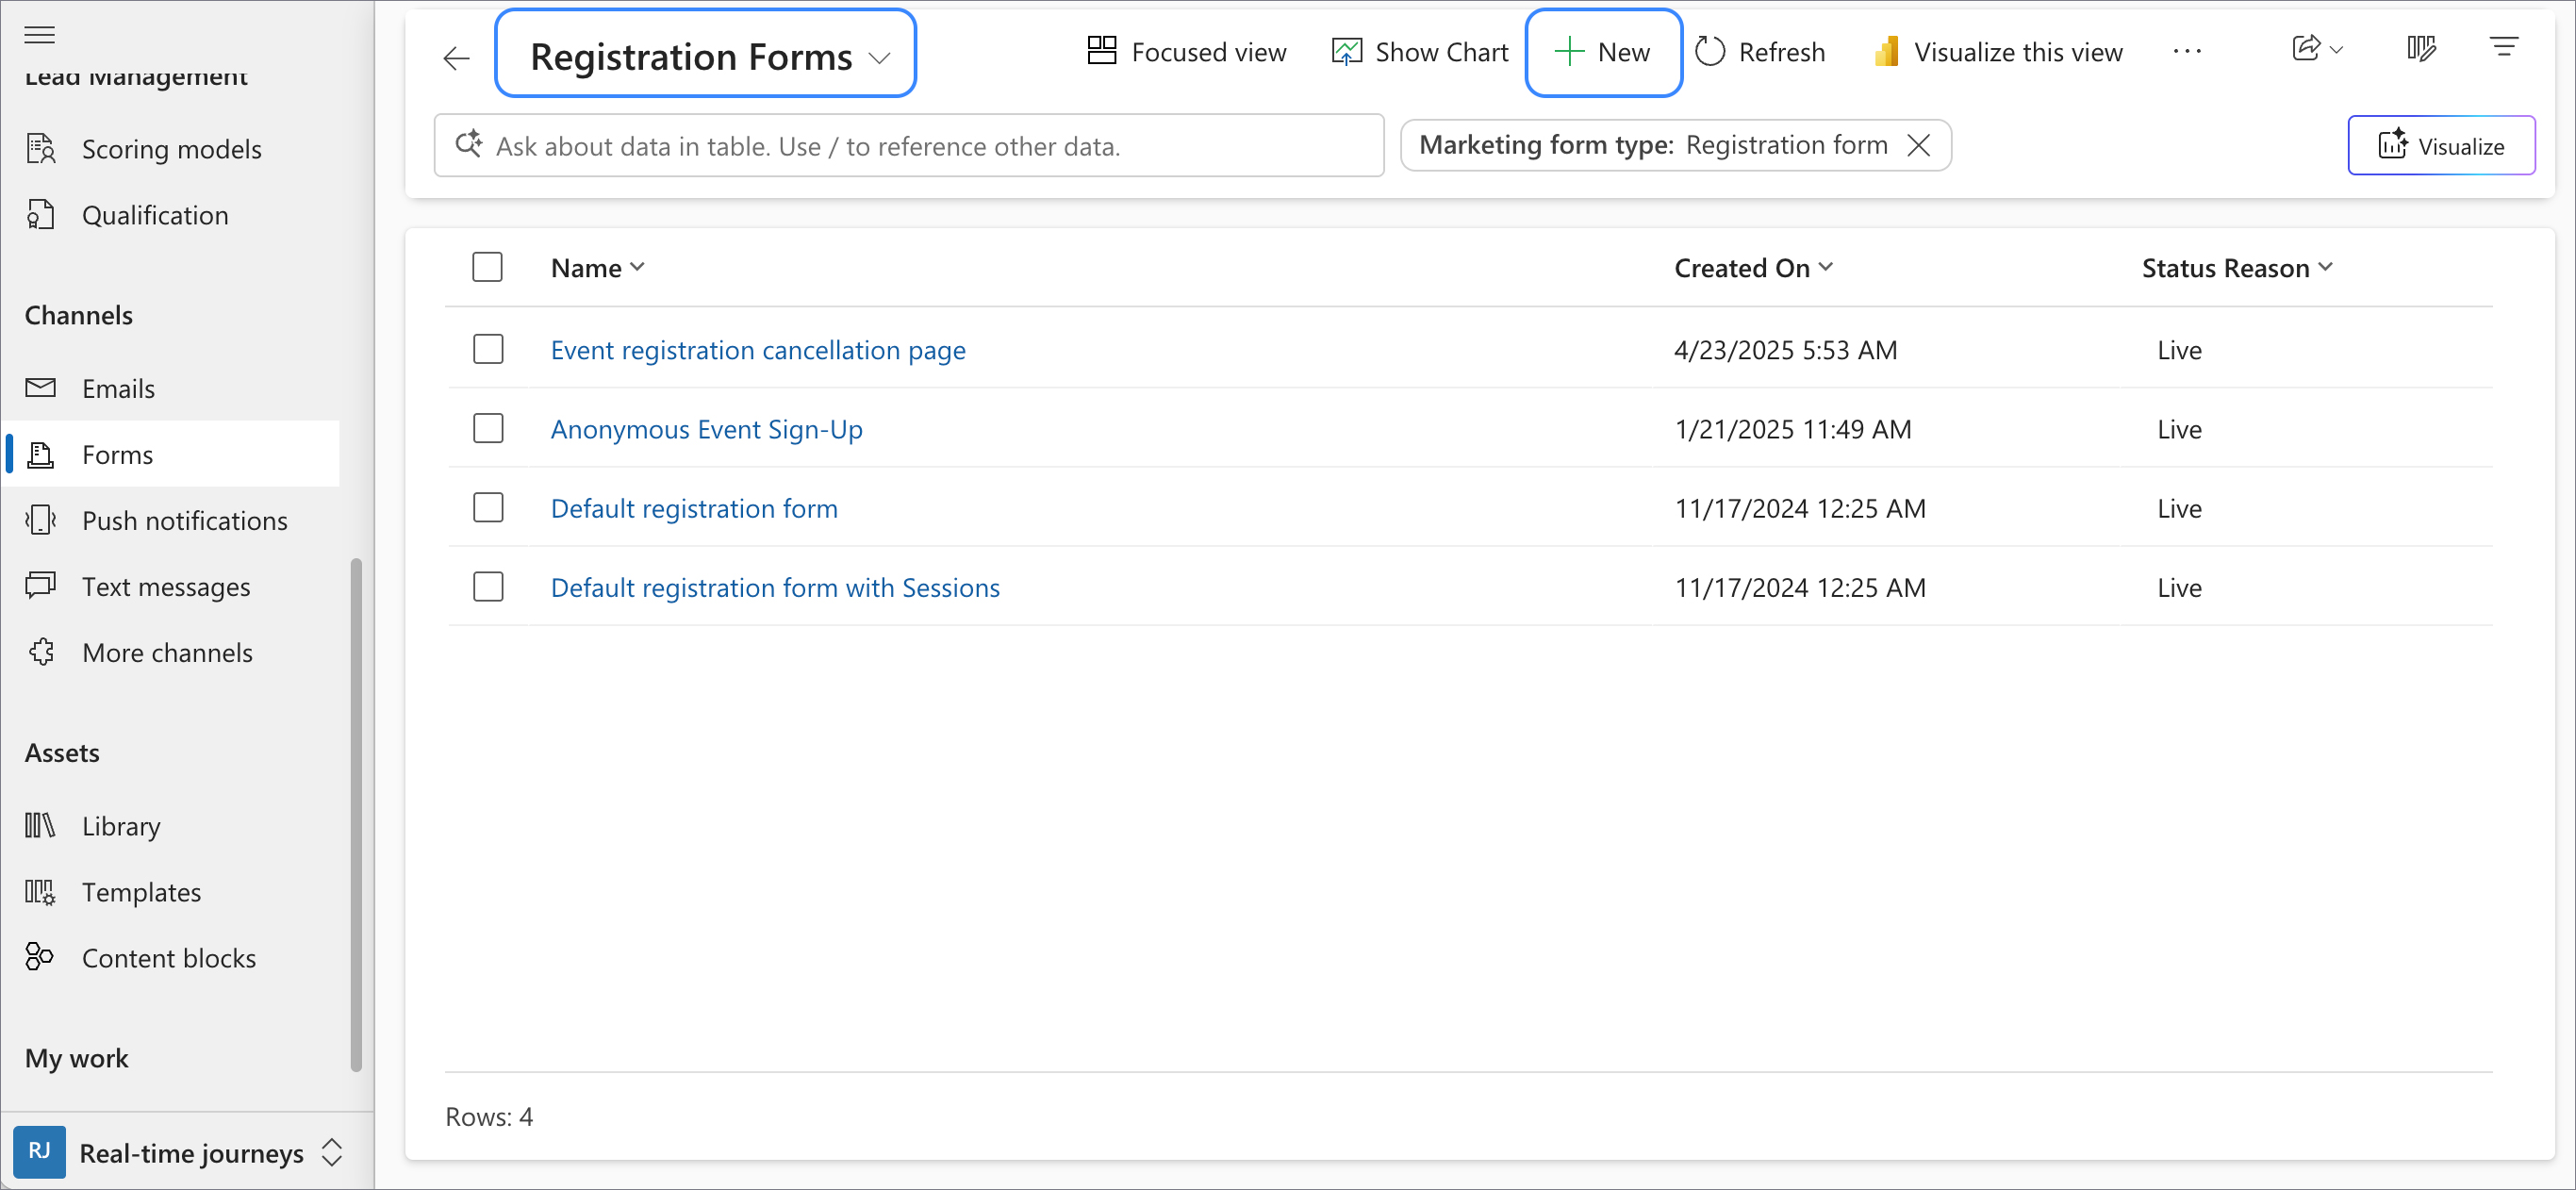
To create a new custom form go to Real-time Journeys area → Forms, Click shevron and choose Registration Forms. Click '+ New' to create a new form.
Copy the raw file registration-form.html from GitHub. Click </> HTML to open the editor, paste the code there, then close the editor and save the form with a name you prefer.
Come back to Event Planning area → Events → Website and Form tab, and change the Default registration form to your new form.
If you wish to customize your own form, you need to add the code below into your form's HTML body to ensure proper form submission and smooth functioning of the 'Event Registration' journey.
The WordPress site passes some data during a client's registration, which is collected as a Form Submission record. These parameters must be defined in HTML as hidden fields.
To find all forms, go to the Customer Insights - Journeys app, navigate to the Real-time Journeys area → Forms, Click shevron and choose Registration Forms. Start editing your form. In the ribbon, click the icon </> HTML to open the HTML editor and add 2 fields - WordPress User Id and Bound Contact Id - using the code below.
<div class="textFormFieldBlock" data-editorblocktype="TextFormField" data-prefill="false" data-hide="hide">
    <label title="Field label" for="wp-userid">WordPress User Id</label>
    <input id="wp-userid" type="text" name="wp-userid" placeholder="wp-userid" title="WordPress User Id" maxlength="256">
</div>
<div class="textFormFieldBlock" data-editorblocktype="TextFormField" data-prefill="false" data-hide="hide">
    <label title="Field label" for="wp-contactid">Bound Contact Id</label>
    <input id="wp-contactid" type="text" name="wp-contactid" placeholder="wp-contactid" title="Field label" maxlength="256">
</div>
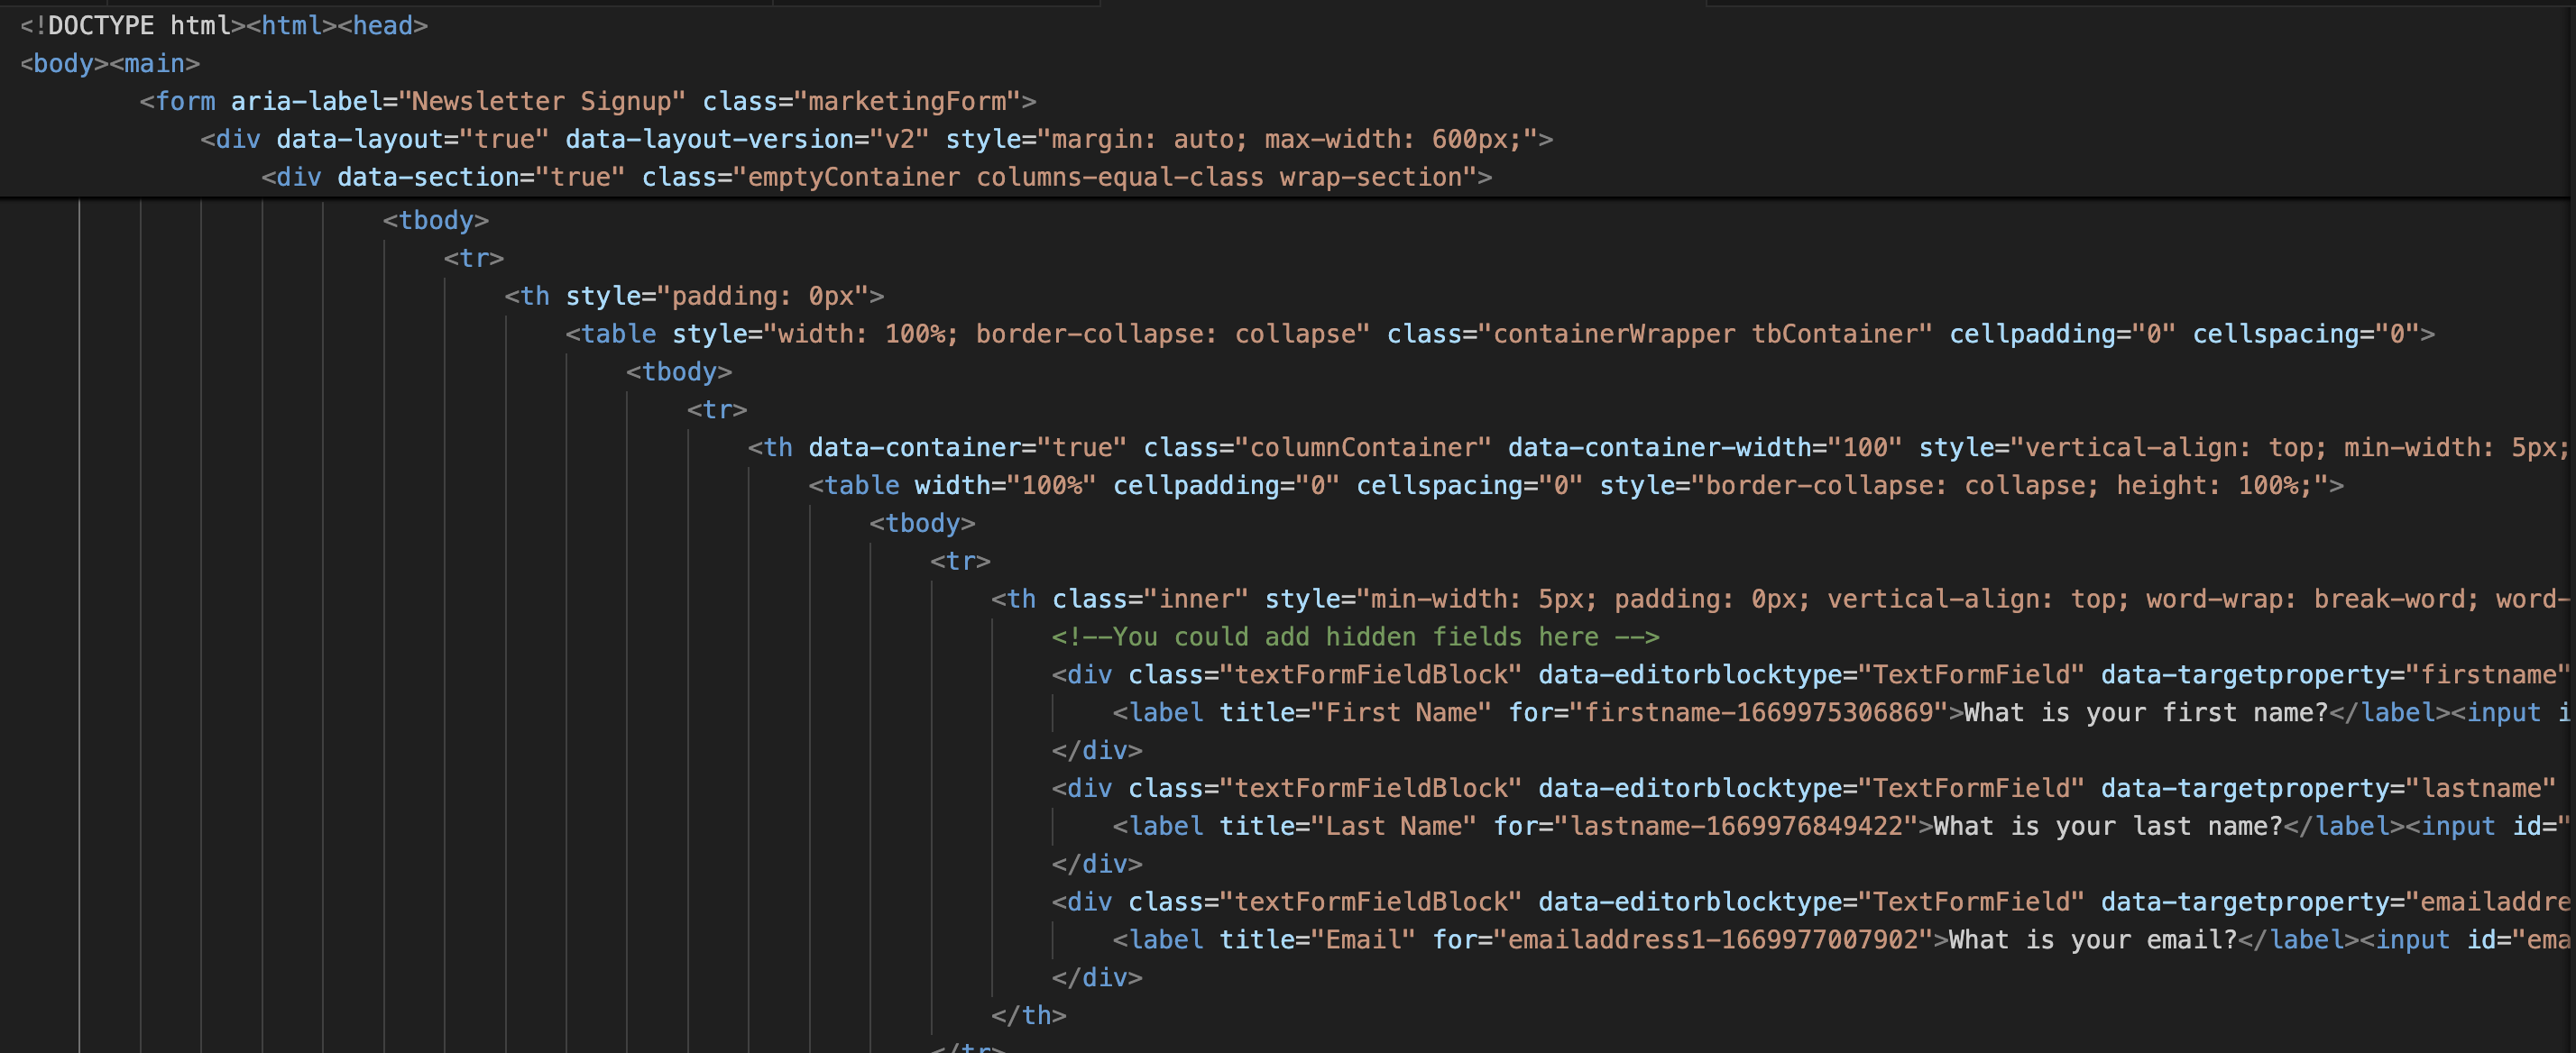
Add this script inside the body tag.
<script>
document.addEventListener("d365mkt-afterformload", updateReturnUrl);
document.addEventListener("d365mkt-afterformload", processHiddenParams);

function updateReturnUrl() {
    if (window.location.search) {
        const formElement = document.querySelector("form[data-redirecturl]");
        if (formElement) {
            // Get the current value of the data-redirecturl attribute
            const currentRedirectUrl = formElement.getAttribute("data-redirecturl");
            // Append the query parameter value to the redirect URL
            const newRedirectUrl = `${currentRedirectUrl}${window.location.search}`;
            // Update the data-redirecturl attribute with the new URL
            formElement.setAttribute("data-redirecturl", newRedirectUrl);
        } else {
            console.warn("Form with data-redirecturl attribute not found.");
        }
    }
}
function prefillHideElement(name, value, hide) {
    const element = document.getElementsByName(name)[0];
    if (!!element) {
        element.value = value;
        if (hide) {
            element.style.display = 'none';
            const container = document.querySelector(`[data-targetproperty="${name}"]`);
            if (!!container) {
                container.style.display = 'none';
            }
        }
    }
}
function processHiddenParams(event) {
    console.log("processContactIdAfterLoad");

    // Retrieve attributes from the event target
    const wpUserId = event?.target?.getAttribute('data-wp-userid') || '';
    const contactId = event?.target?.getAttribute('data-wp-contactid') || '';

    console.log(`wpUserId: ${wpUserId}`);
    console.log(`contactId: ${contactId}`);

    const contactEmail = event?.target?.getAttribute('data-wp-email') || '';
    const contactFirstName = event?.target?.getAttribute('data-wp-firstname') || '';
    const contactLastName = event?.target?.getAttribute('data-wp-lastname') || '';

    //Set hidden fields for WP user Id and contact Id
    const wpUserInput = document.getElementsByName('wp-userid')[0];
    if (!!wpUserInput) {
        wpUserInput.value = wpUserId;
    }
    const contactInput = document.getElementsByName('wp-contactid')[0];
    if (!!contactInput) {
        contactInput.value = contactId;
    }

    const hide = wpUserId && contactId; // hide if user signed in and bound to a contact
    prefillHideElement('emailaddress1',  contactEmail, hide);
    prefillHideElement('firstname', contactFirstName, hide);
    prefillHideElement('lastname', contactLastName, hide);
}
</script>
You can also find tips on styling the form in the Modifying the Look and Feel: Registration Form section.
Event Registration Settings
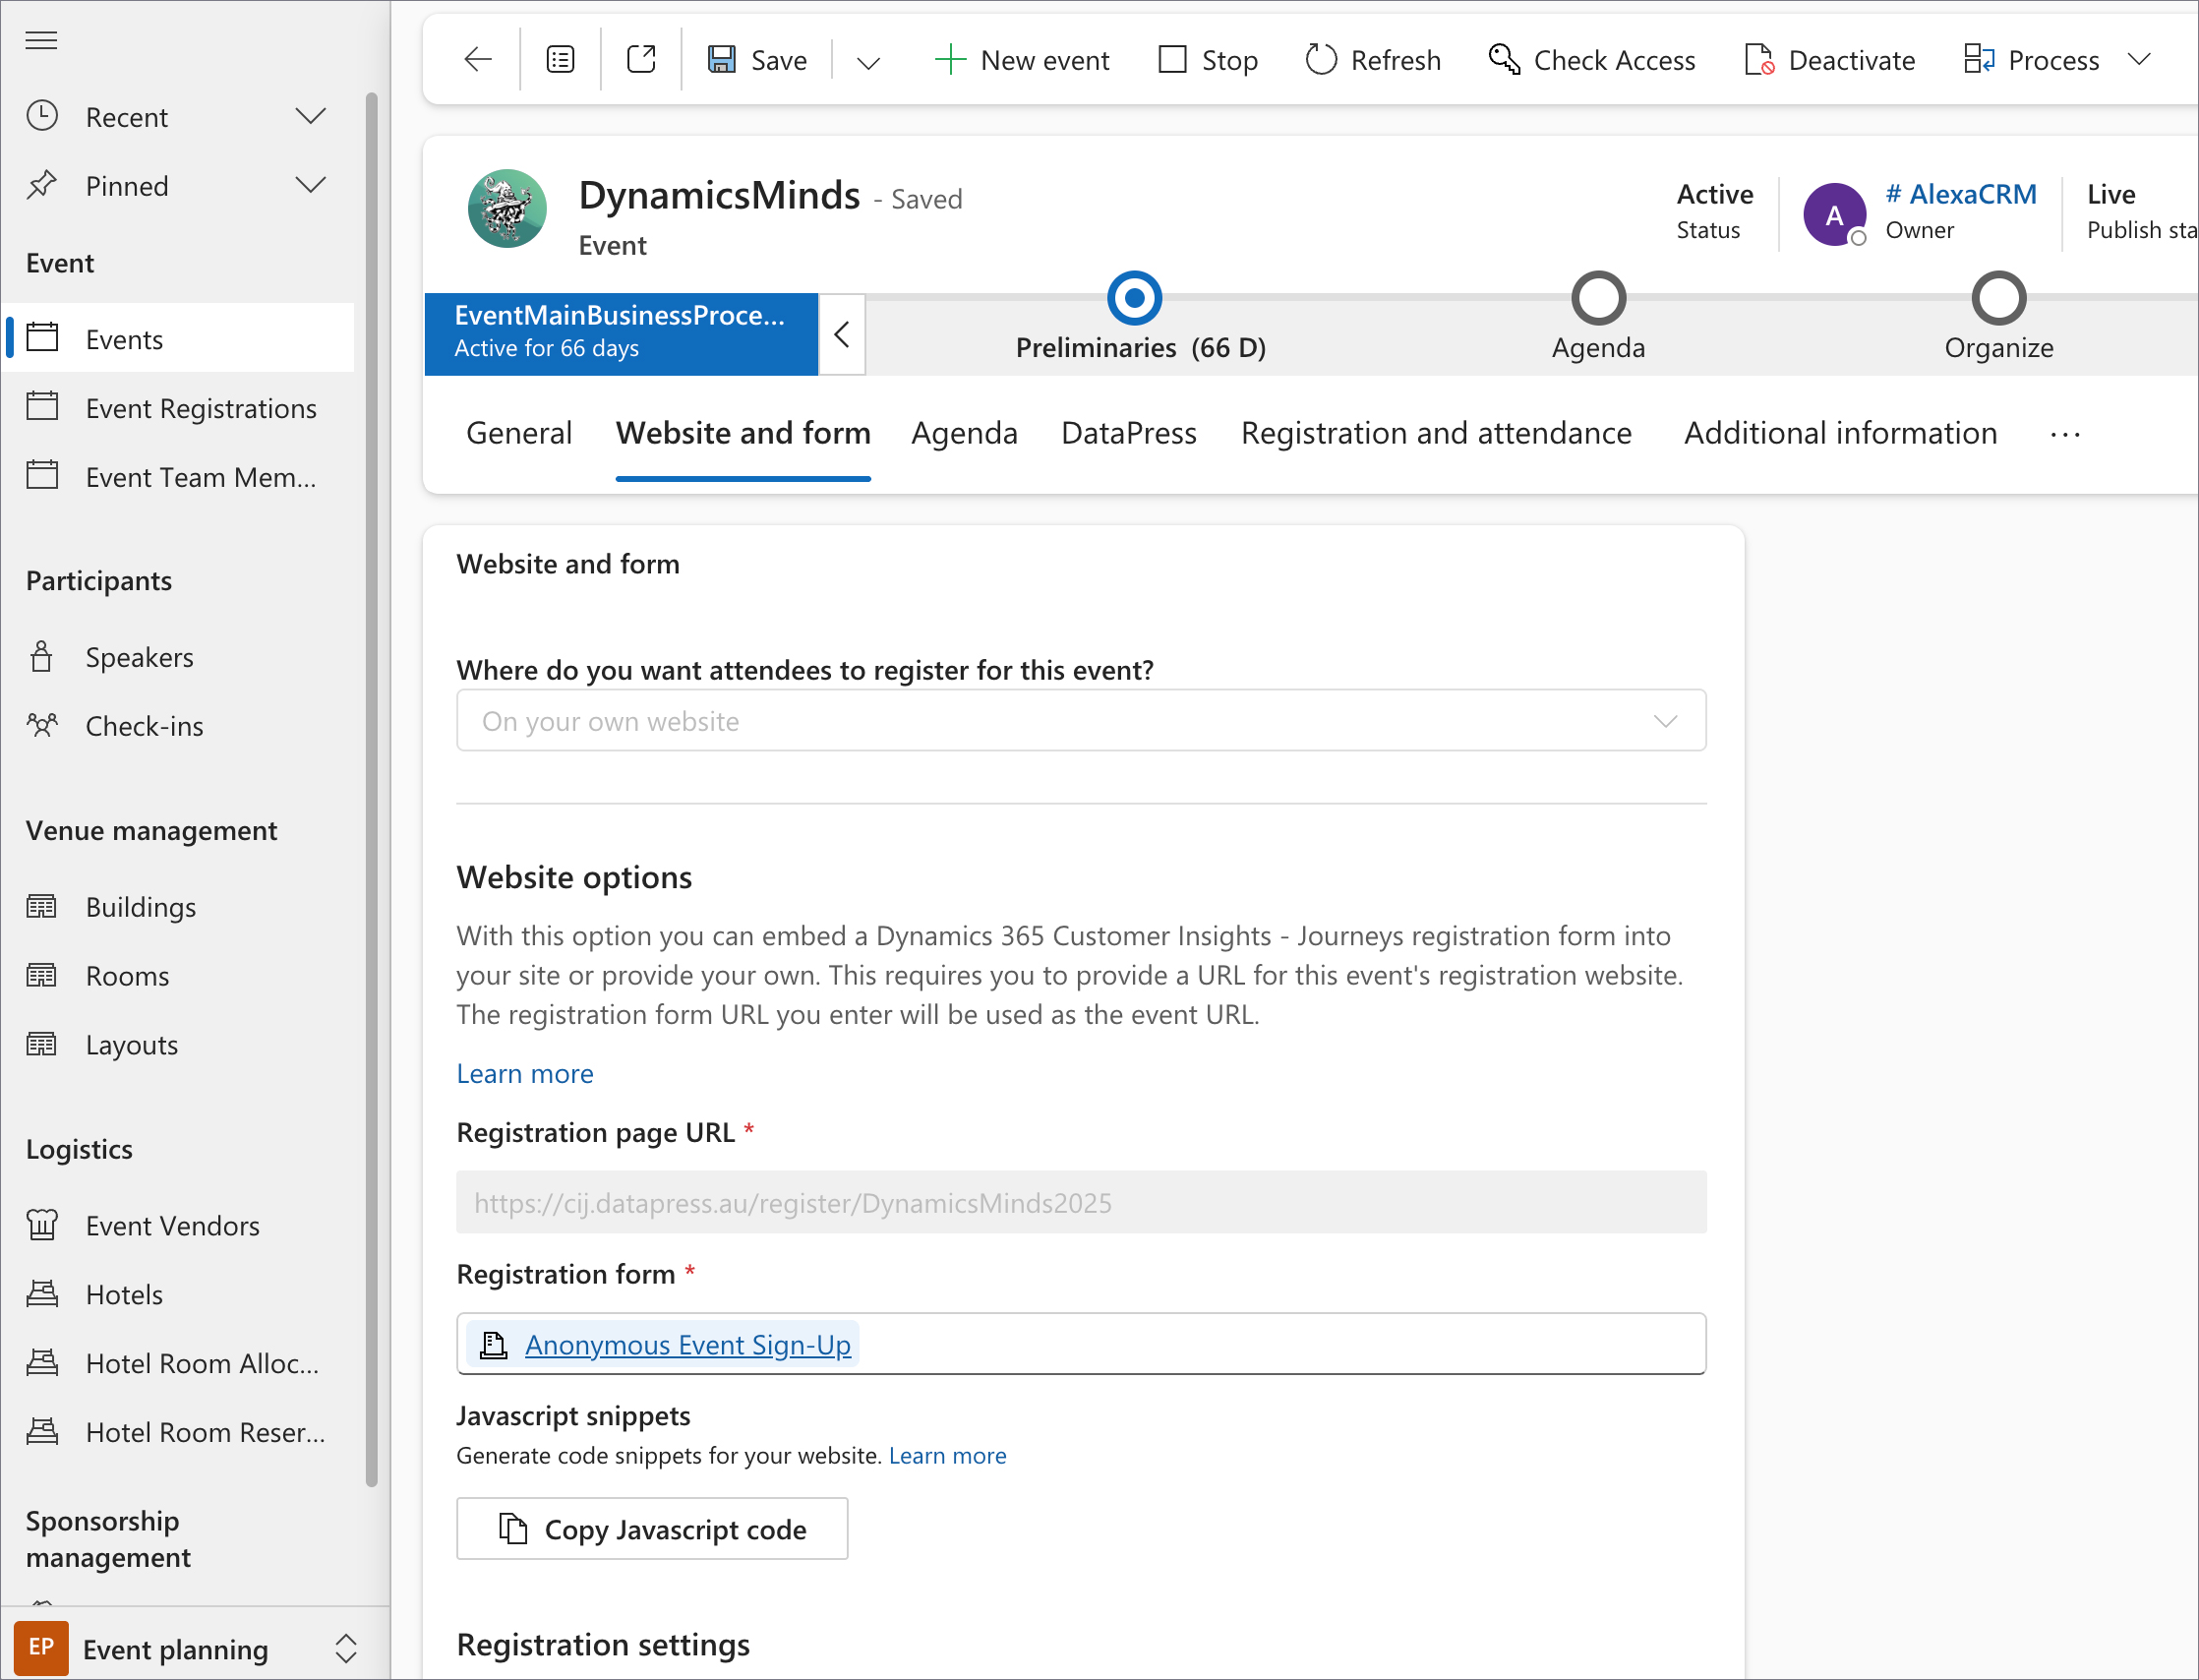
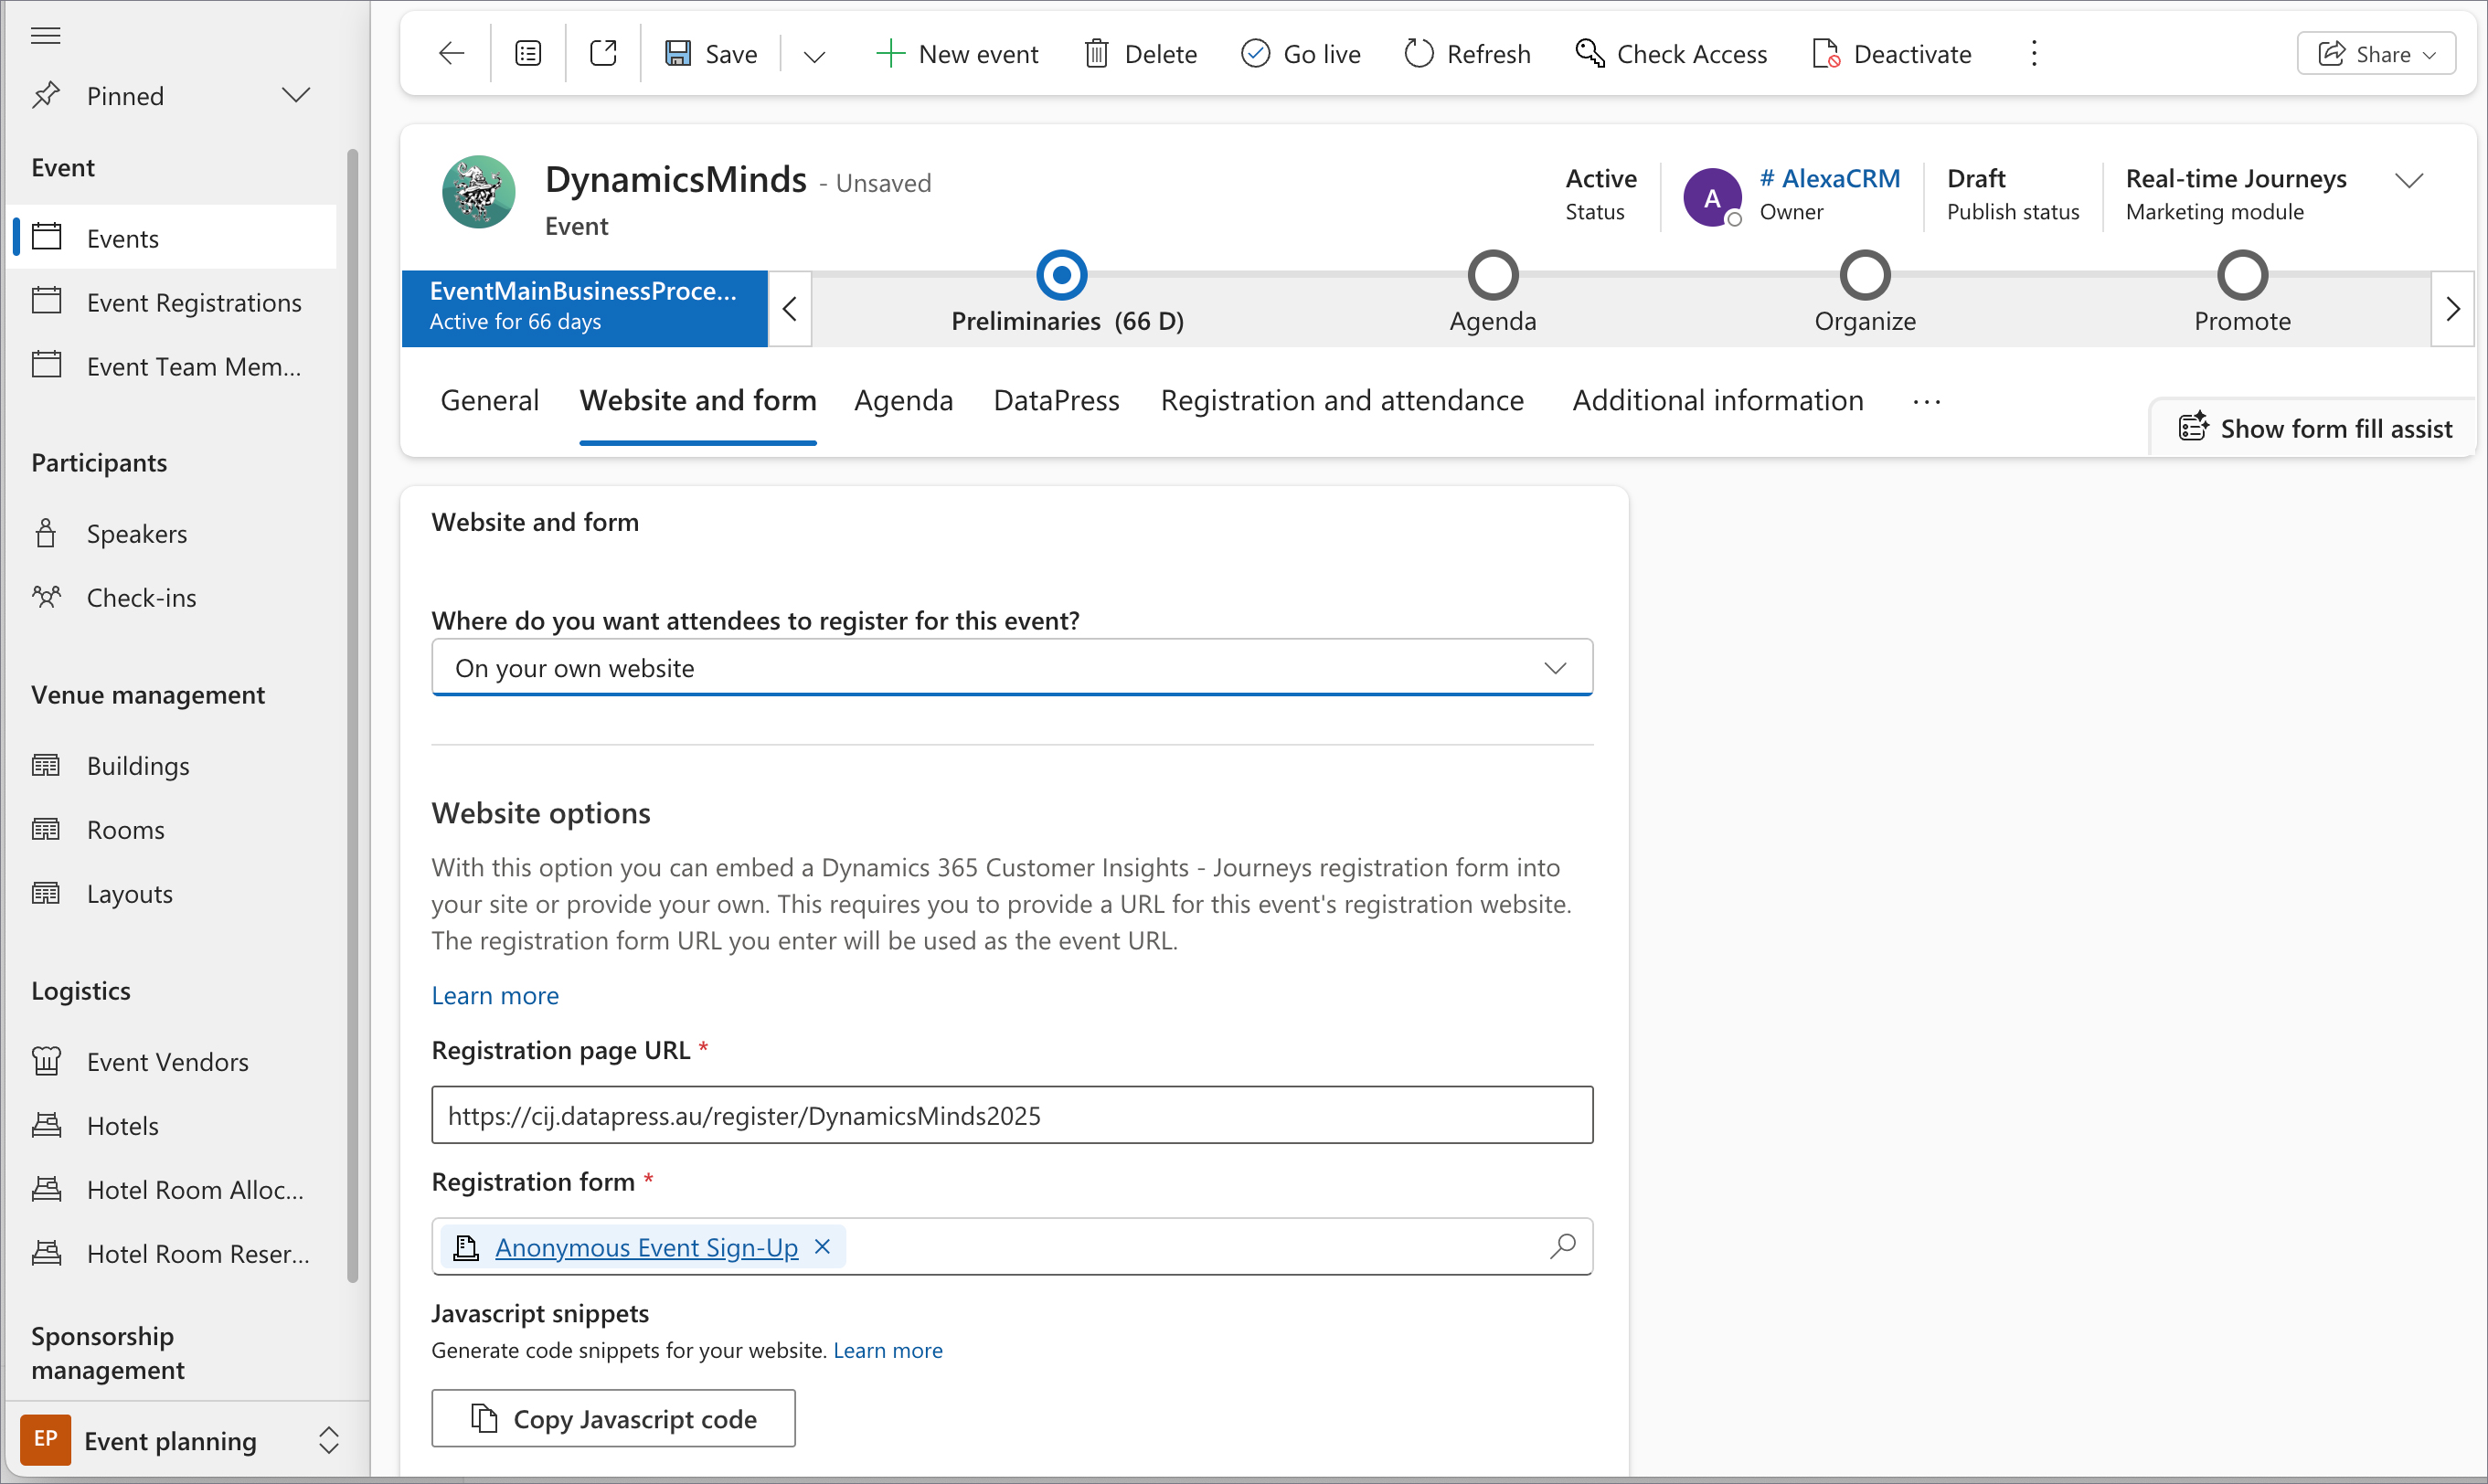
In the Event Planning area → Events → Website and Form tab, under the drop-down Where do you want attendees to register for this event?, select On your own website.
Below fill in Registration page URL with https://{your-site-url}/register/{readable-event-id}. You can find Readable Event ID in the Event Planning area → Events → DataPress tab.
Custom Trigger
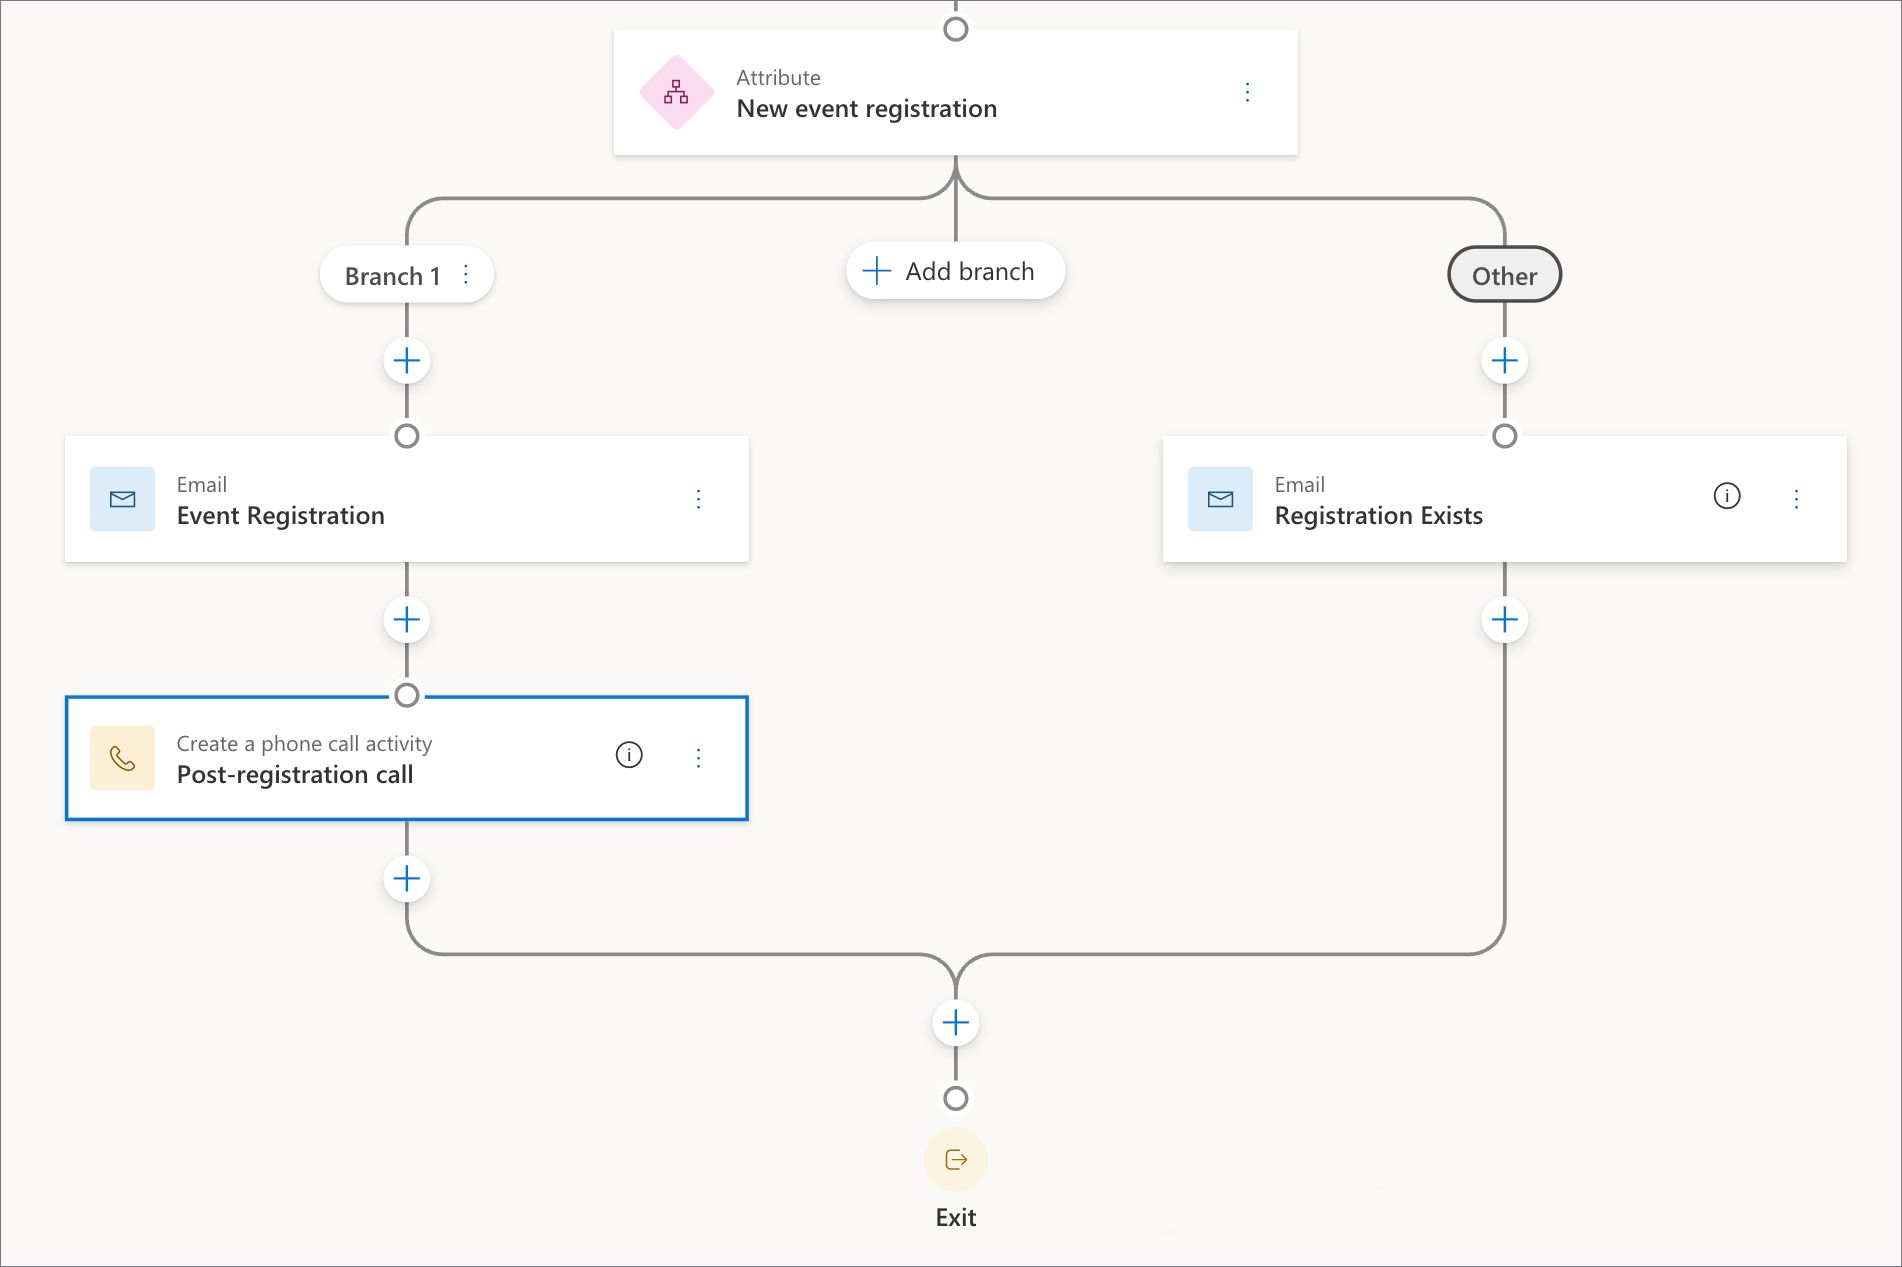
Form submission triggers the [Events] Form Submitted Power Automate flow, which invokes the Event Registration custom trigger via an HTTP request.
A custom trigger need to be used to understand whether a new WordPress user was created and whether a password reset link needs to be sent. It also helps prevent duplicate event registrations if the contact is already registered for the event.
Parameters passed to the trigger by the flow:
- Customer Data - Contact reference.
- Event Registration Id – Entity reference that points to a specific event registration and defines related attributes.
- New Registration – Type: boolean. Defines whether it is a newly created registration or a duplicate.
- New WordPress User – Type: boolean. Defines whether a new WordPress user was created.
- WordPress Site Url – WordPress site URL.
- Password Reset Link – Link for a newly created WordPress user to reset their password.
Journey
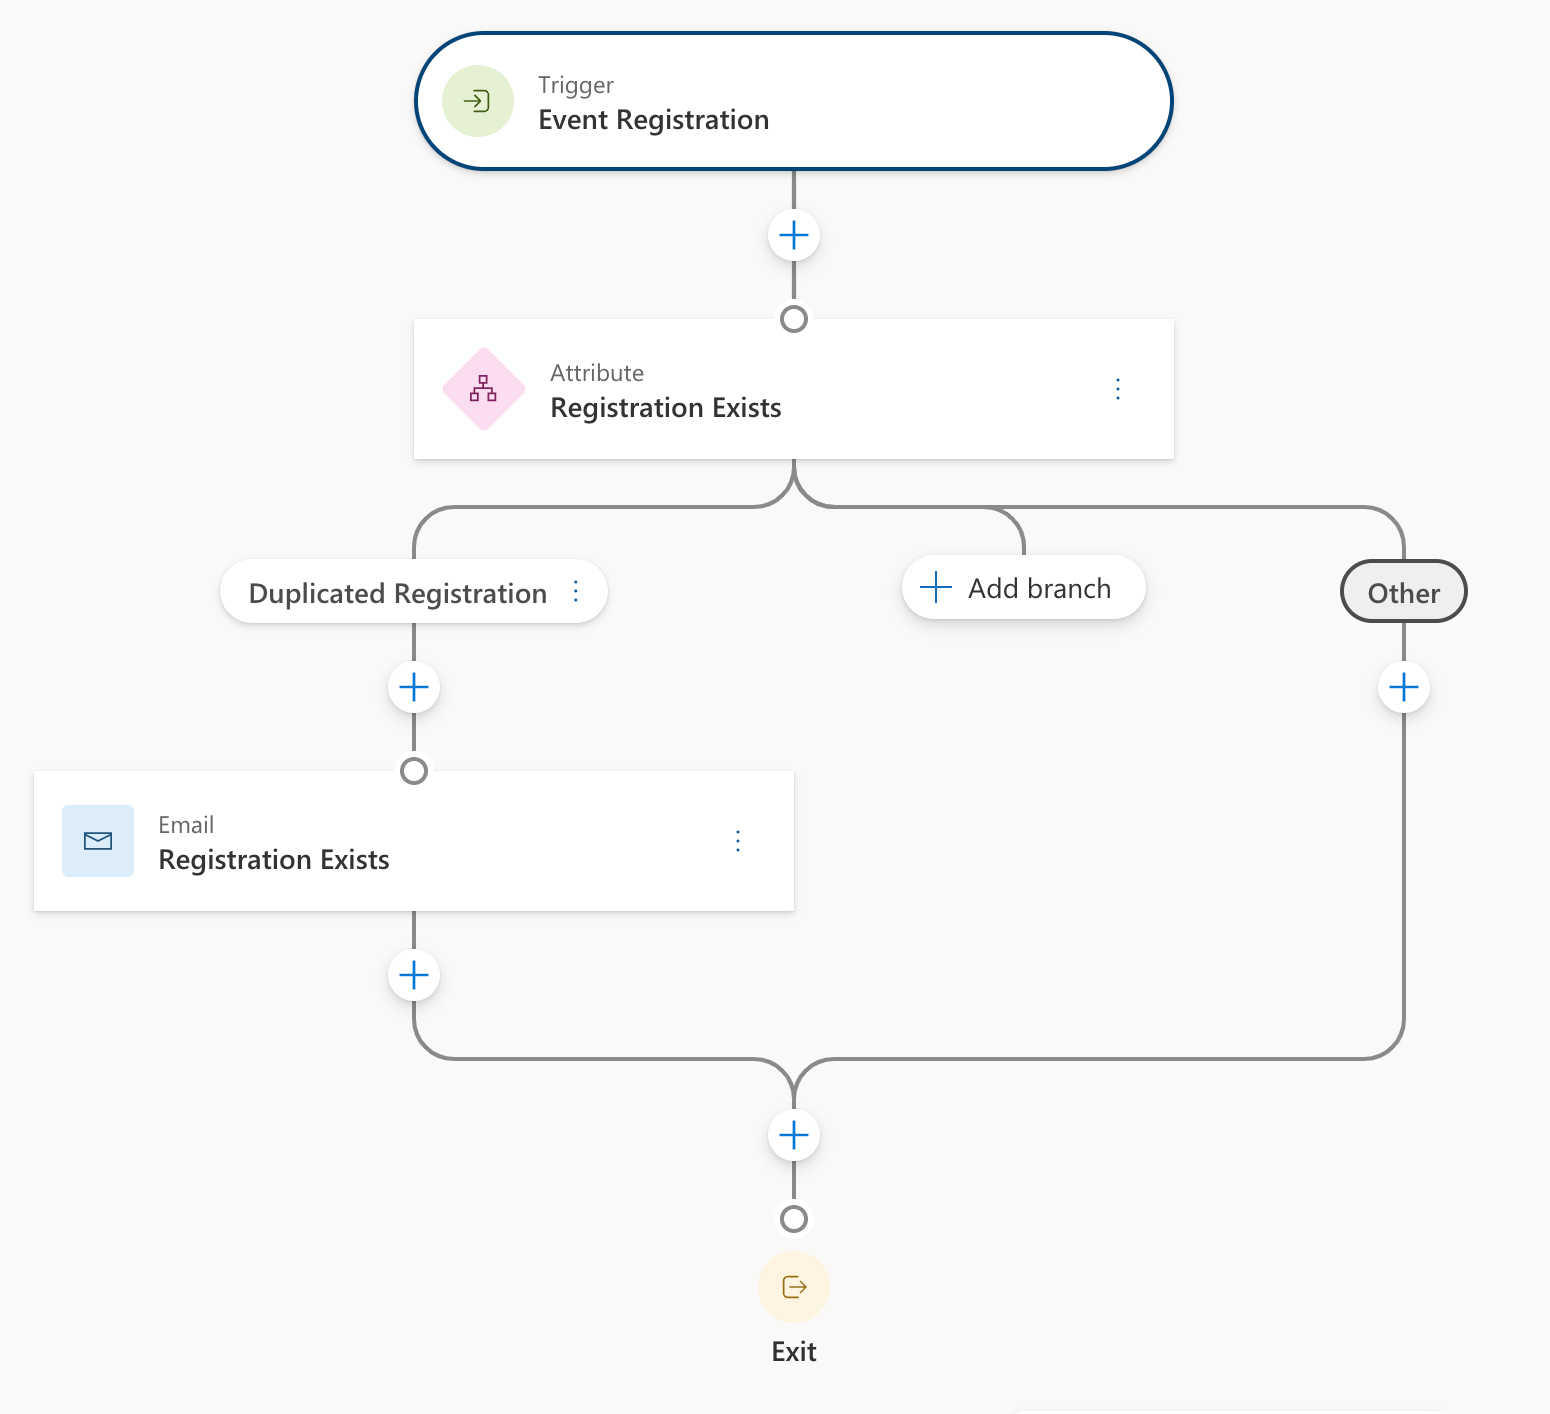
The trigger starts two separate journeys: Event Registration Journey and Registration Exists Journey. The Event Registration Journey is the primary process that guides the client through the entire registration experience, ensuring they receive relevant confirmations and updates. The Registration Exists Journey notifies clients if they attempt to register for the same event more than once, ensuring they are informed that their registration is already recorded.
Follow the instructions below - How to create a Journey - to create a basic Journey using the parameters passed by the Event Registration trigger. You can customize it as needed to align with your business requirements.
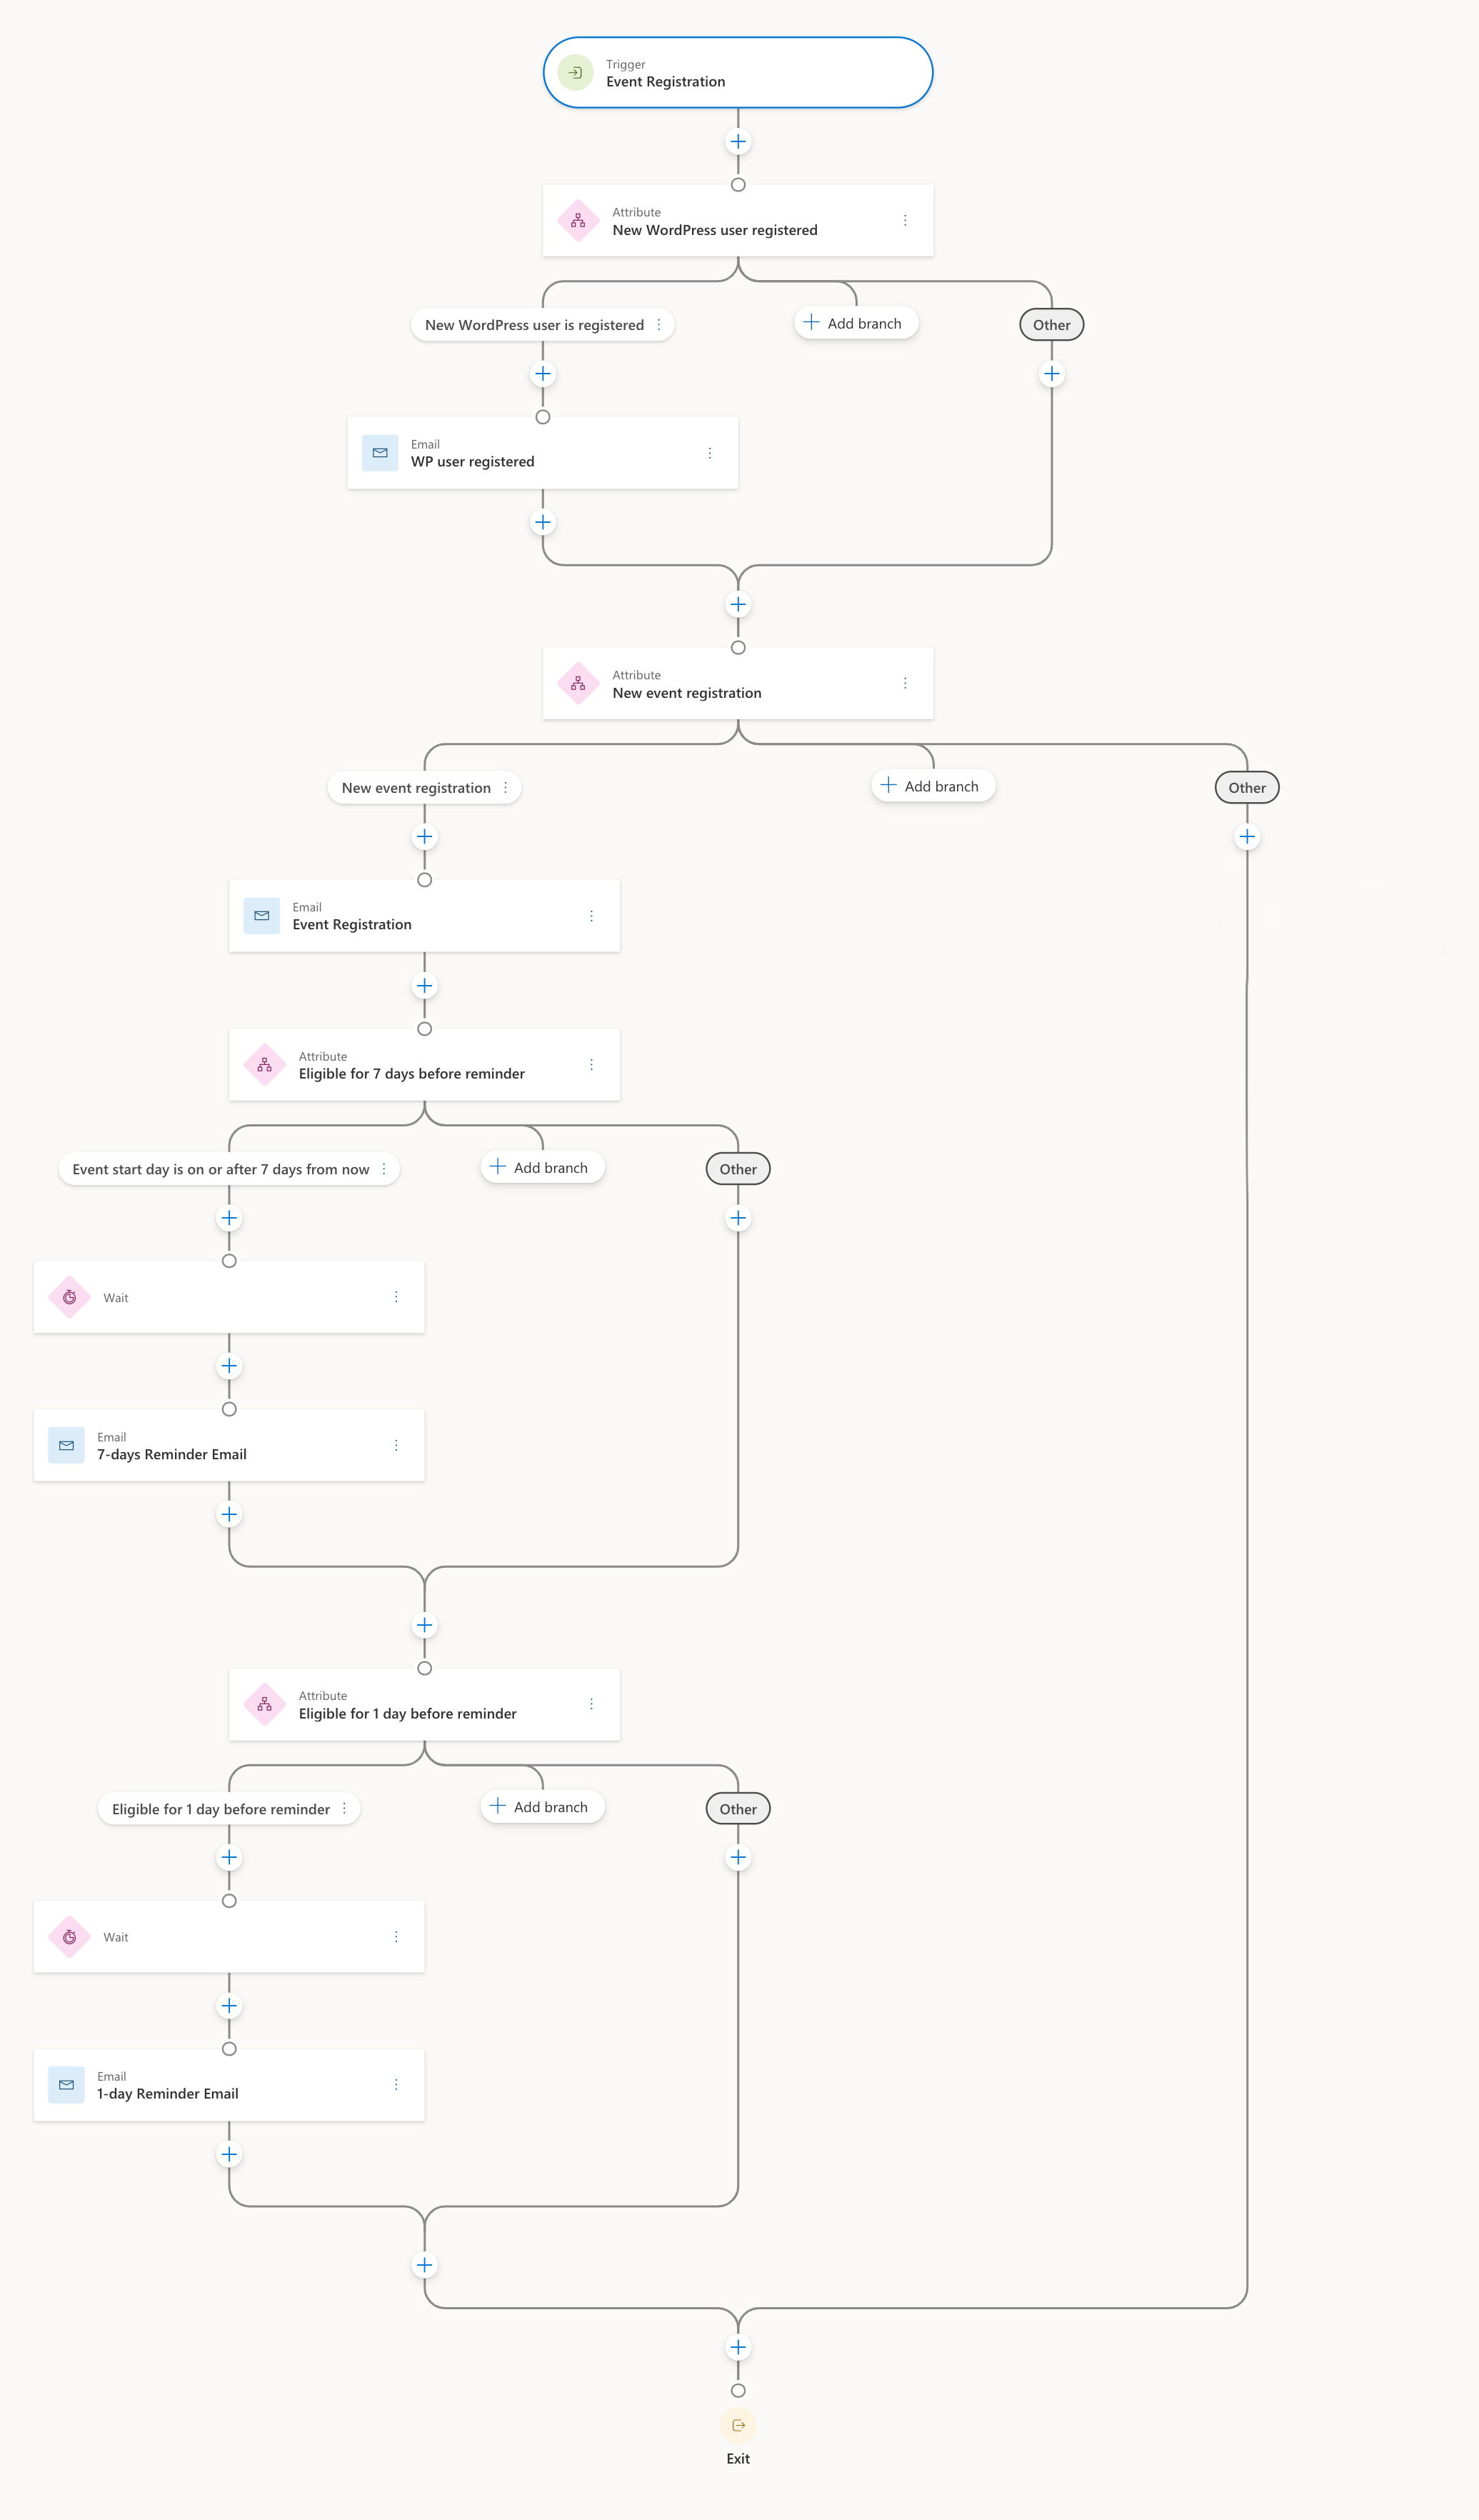
The final result for Event Registration Journey should look like this.
For Registration Exists Journey, the final result should appear as follows.
How to create a Journey
First let's create Event Registration Journey
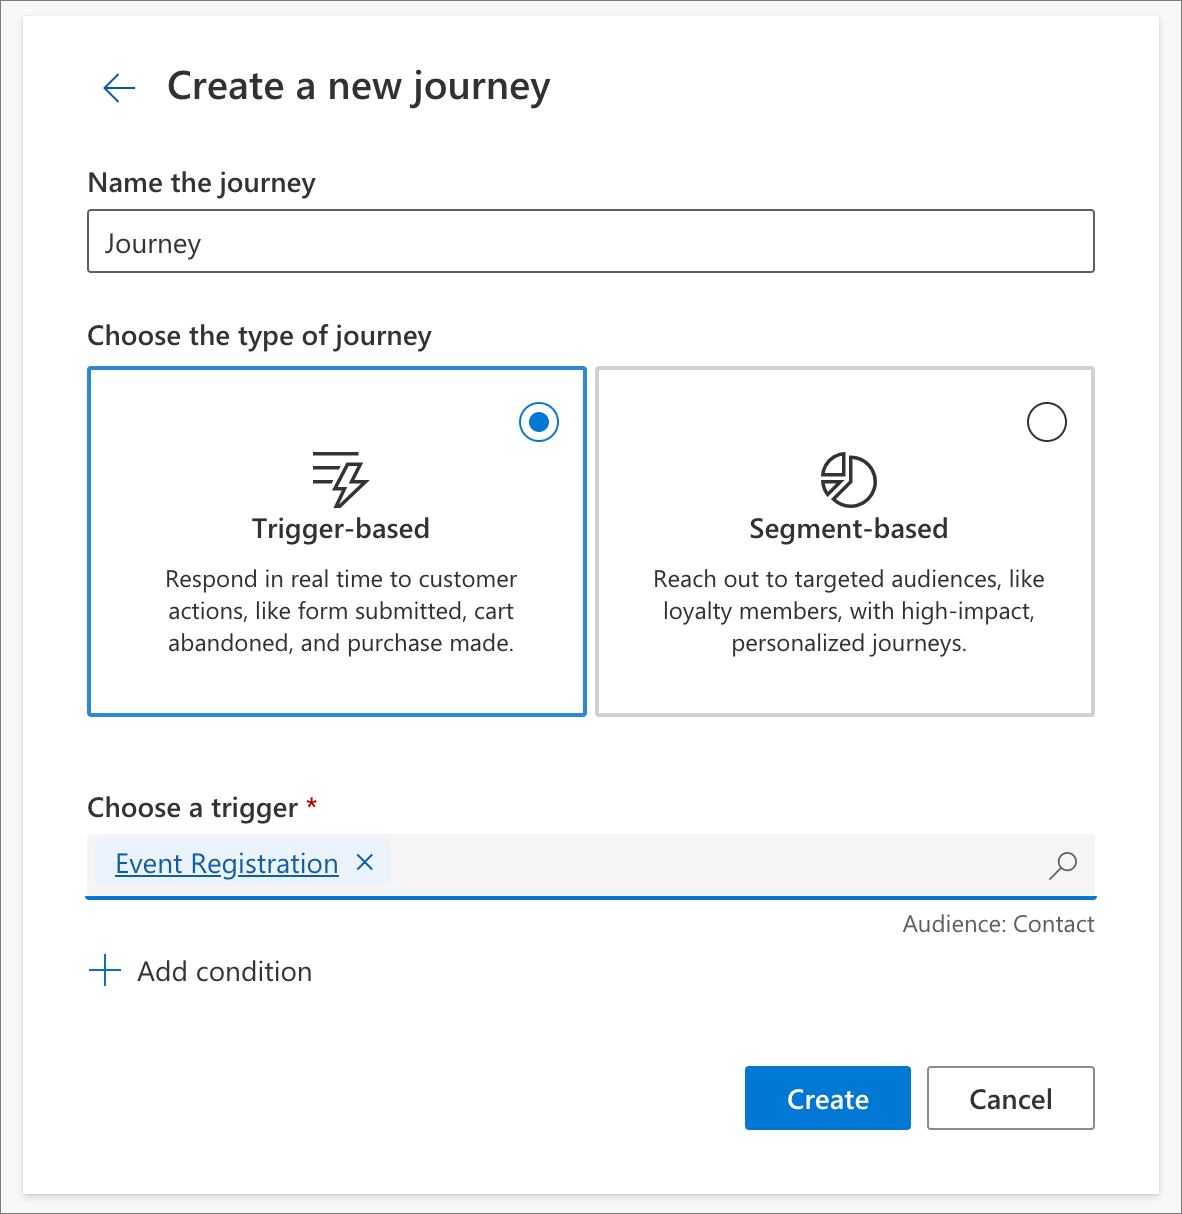
- Create a new Journey from blank. Choose the type Trigger-based and select the Event Registration trigger.
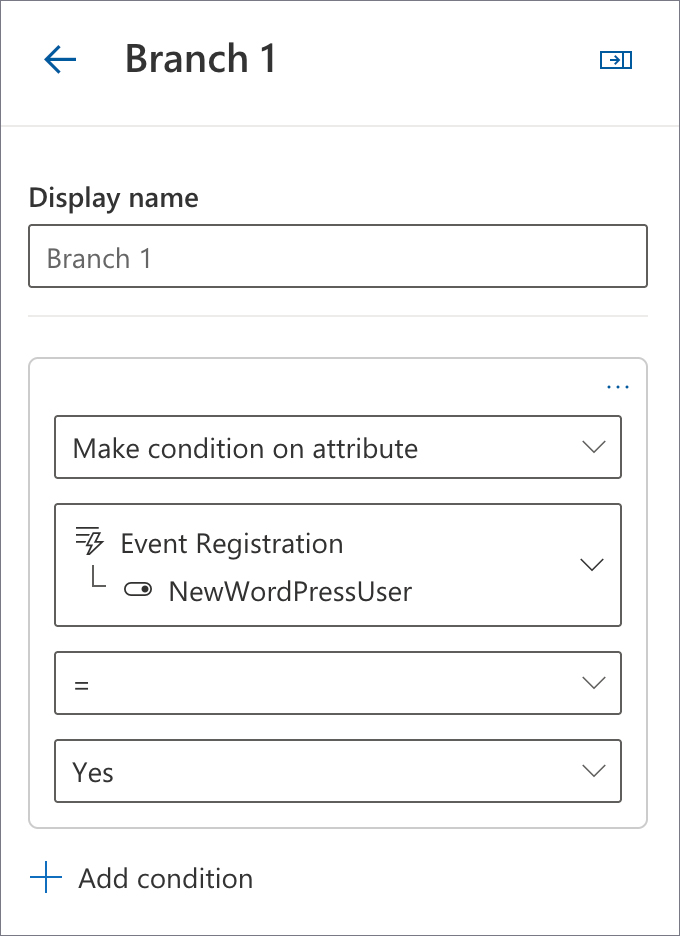
- Attribute New WordPress user registered. Add a condition Attribute branch. Find the trigger parameter NewWordPressUser and set it to Yes.
-
Left branch New WordPress user registered. Add the Email WP user registered.
-
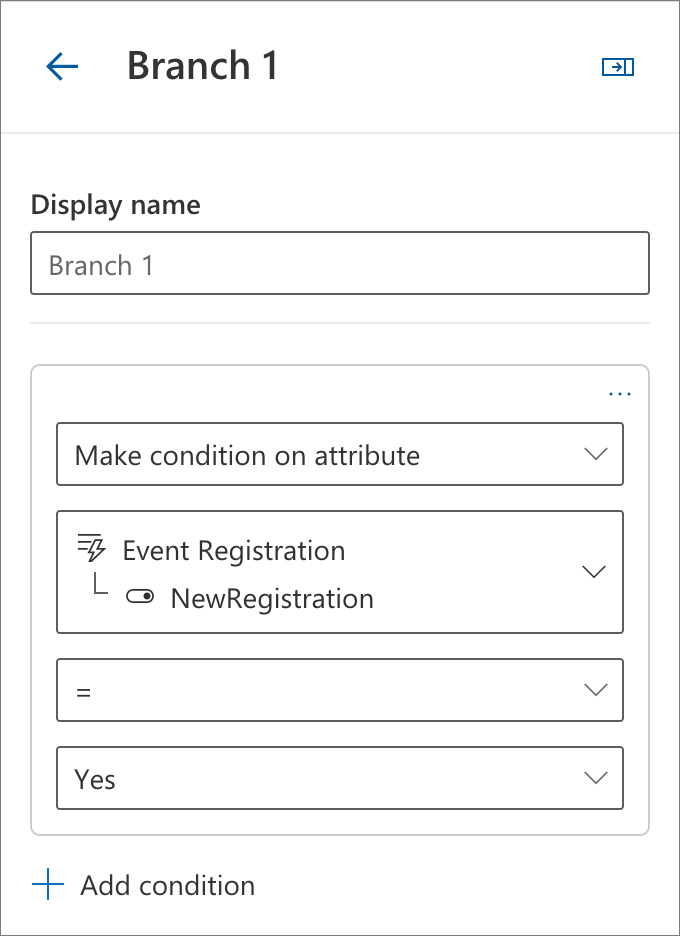
Attribute New event registration. Add a condition Attribute branch. Find the trigger parameter NewRegistration and set it equal to Yes.
-
Left branch New Event Registration. Add the Email Event registration.
-
Continue on the Left branch New Event Registration. Attribute Eligible for 7 days before reminder. Add a condition Attribute branch and apply a condition to the trigger attribute Event start day, setting it to on or after 7 days from now.
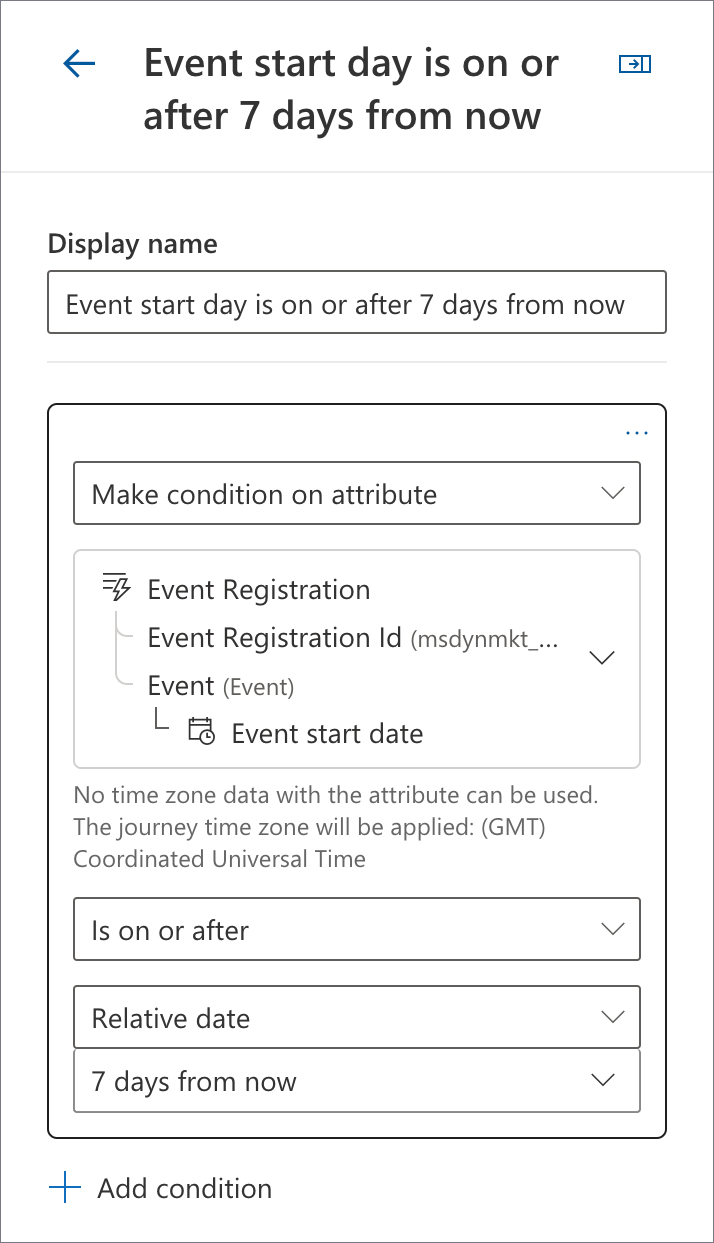
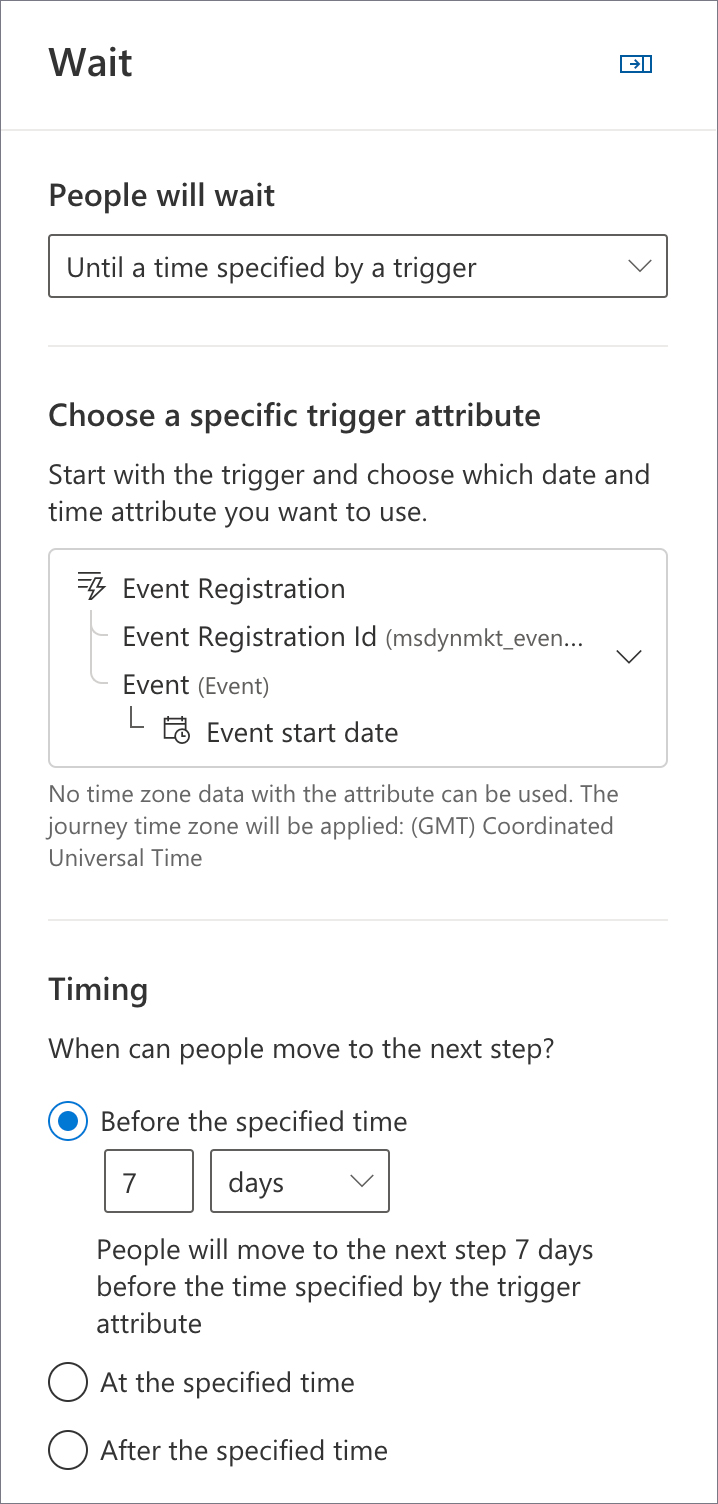
- Left branch Event start day is on or after 7 days from now. Add a Wait time condition and set it to 7 days before the event start day.
-
Continue on the same branch Event start day is on or after 7 days from now. Add the Email 7-day reminder email.
-
Left Branch New event registration. Attribute Eligible for 1 day before reminder. Add a condition Attribute branch and apply a condition to the trigger attribute Event start day, setting it to on or after 1 day from now.
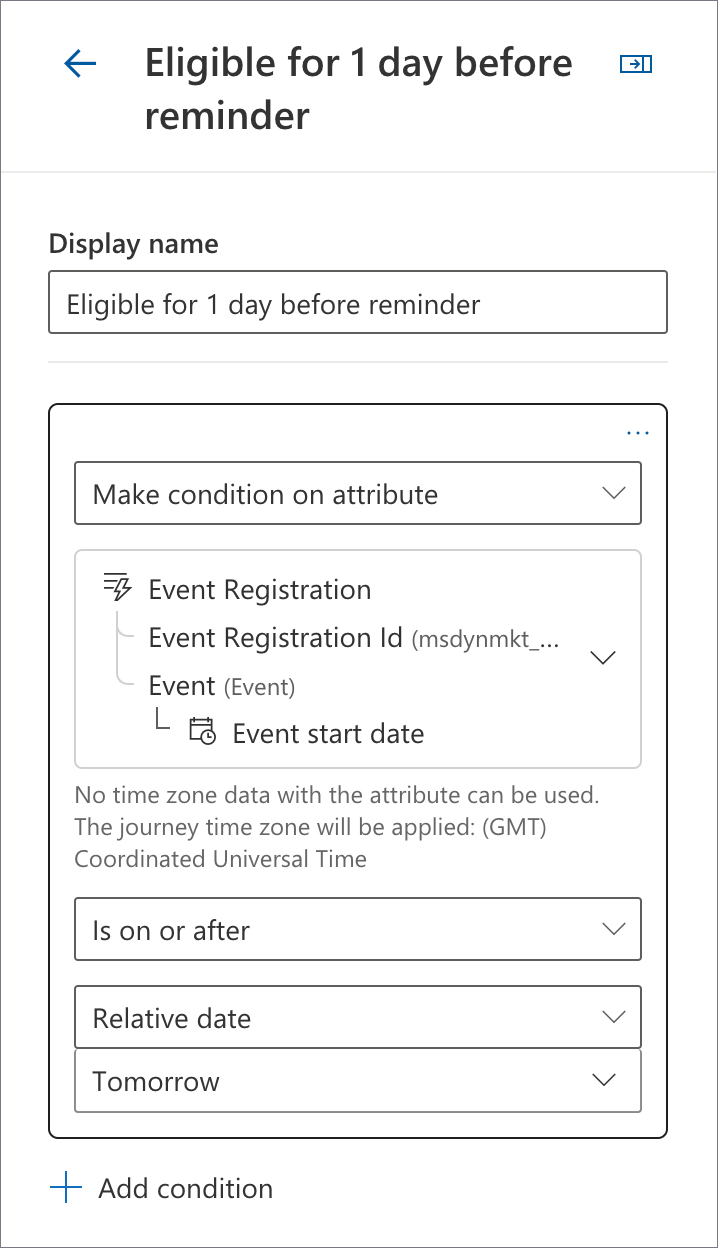
-
Left branch Event start day is on or after 1 day before reminder. Add a Wait time condition and set it to 1 days before the event start day.
-
Continue on the same branch Event start day is on or after 1 days from now. Add the Email 1-day reminder email.
Use the left branch (New Event Registration) of the New event registration condition if you want to add any other post-registration actions to your Journey. Actions that you add after the conditional branches will trigger unconditionally. For example, a client can register twice for the same event, and performing post-registration activities twice due to an accidental duplicate registration might result in poor customer experience.
Now let's take a look at the Registration Exists Journey creation process.
-
Simply create another journey from blank and select the same Event Registration trigger again.
-
Attribute Registration Exists. Add a condition Attribute branch. Find the trigger parameter NewRegistration and set it equal to No.
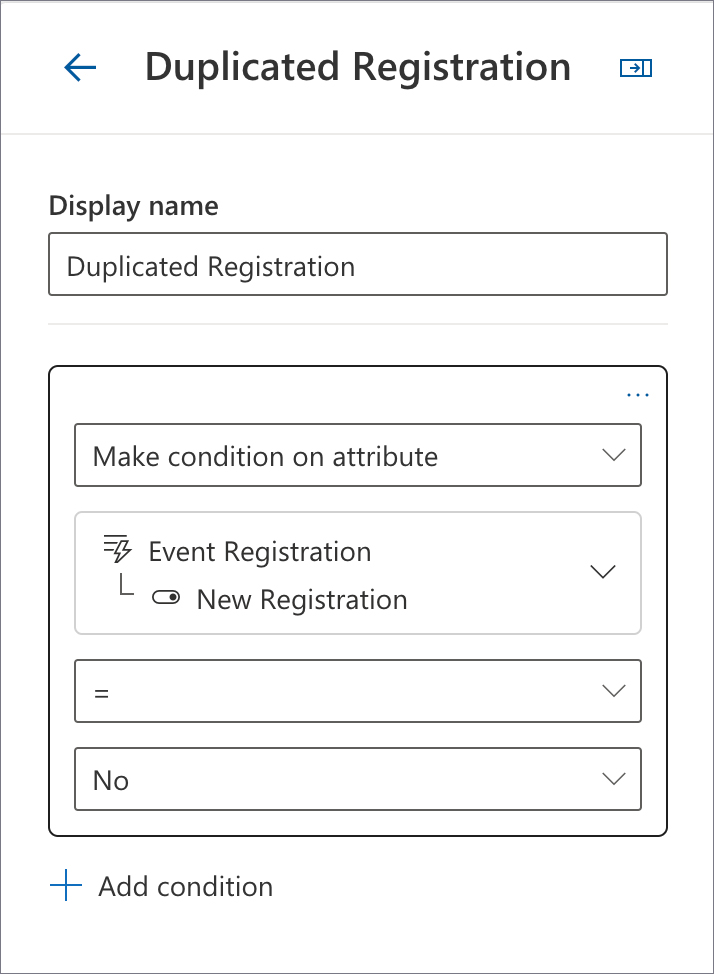
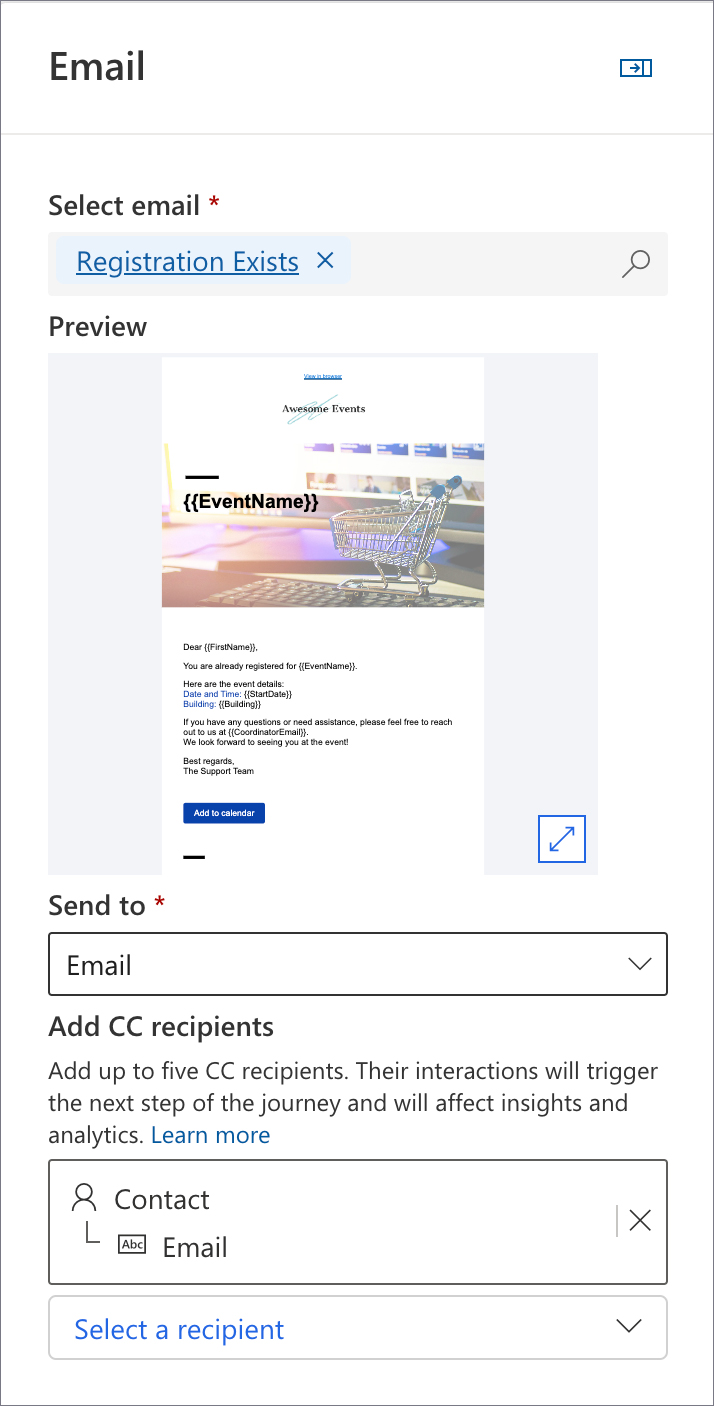
- Left branch Duplicated Registration. Add the Email Registration Exists.
Payments
To be completed
Event Cancellation
To be completed
Emails
The solution includes five email templates to illustrate how you can configure your communication. You can edit them both from the solution and from the Customer Insights – Journeys application under the Real-time Journeys area → Assets → Templates → Email.
Please feel free to modify these templates to include details specific to your events and align them with your company’s brand style for a more personalized and professional experience.
Email Templates
-
Event Registration Template
This template is used to create the email sent when a new customer successfully registers for an event. It includes event details in the email body. -
Registration Exists Template
It is used to create the email sent if a customer has already registered for the event. The condition is checked by a contact email. Provides a notification along with the event details. -
WP User Registered Template
It is used to create the email sent to customers with information about their WordPress account. Includes:- Site URL
- Username
- Password reset link
-
7-Day Reminder Template – For a reminder email one week before the event.
-
1-Day Reminder Template – For a final reminder email the day before the event.
Default Configuration
By default, the coordinator's email address is set to the Event Owner's Primary Email.
If you need to specify a different email address for the coordinator:
- Add a custom field to define the coordinator's contact information.
- Edit the email, go to the Personalize tab on the right, and change the CoordinatorEmail value.
Event Portal Management Table
The solution contains the Event Portal Management table, where you can define options to configure event display settings and data mapping.
In the Events table in Customer Insights - Journey app, some useful fields are hidden. For example, msevtmgt_description is used for the event description, and msevtmgt_eventimage is the event image. You can still use these fields or create your own custom fields instead.
If you prefer to add your own fields, please change the values of template/event/columns/description and template/event/columns/image accordingly in the Event Portal Management table to match your field names.
Read more about table settings affecting the site style in the Modifying the Look and Feel. Event Portal Management Table
Modifying the Look and Feel
This section provides some basic guidelines on how you can adjust the visual style of your website to match your branding and design preferences
Registration Form
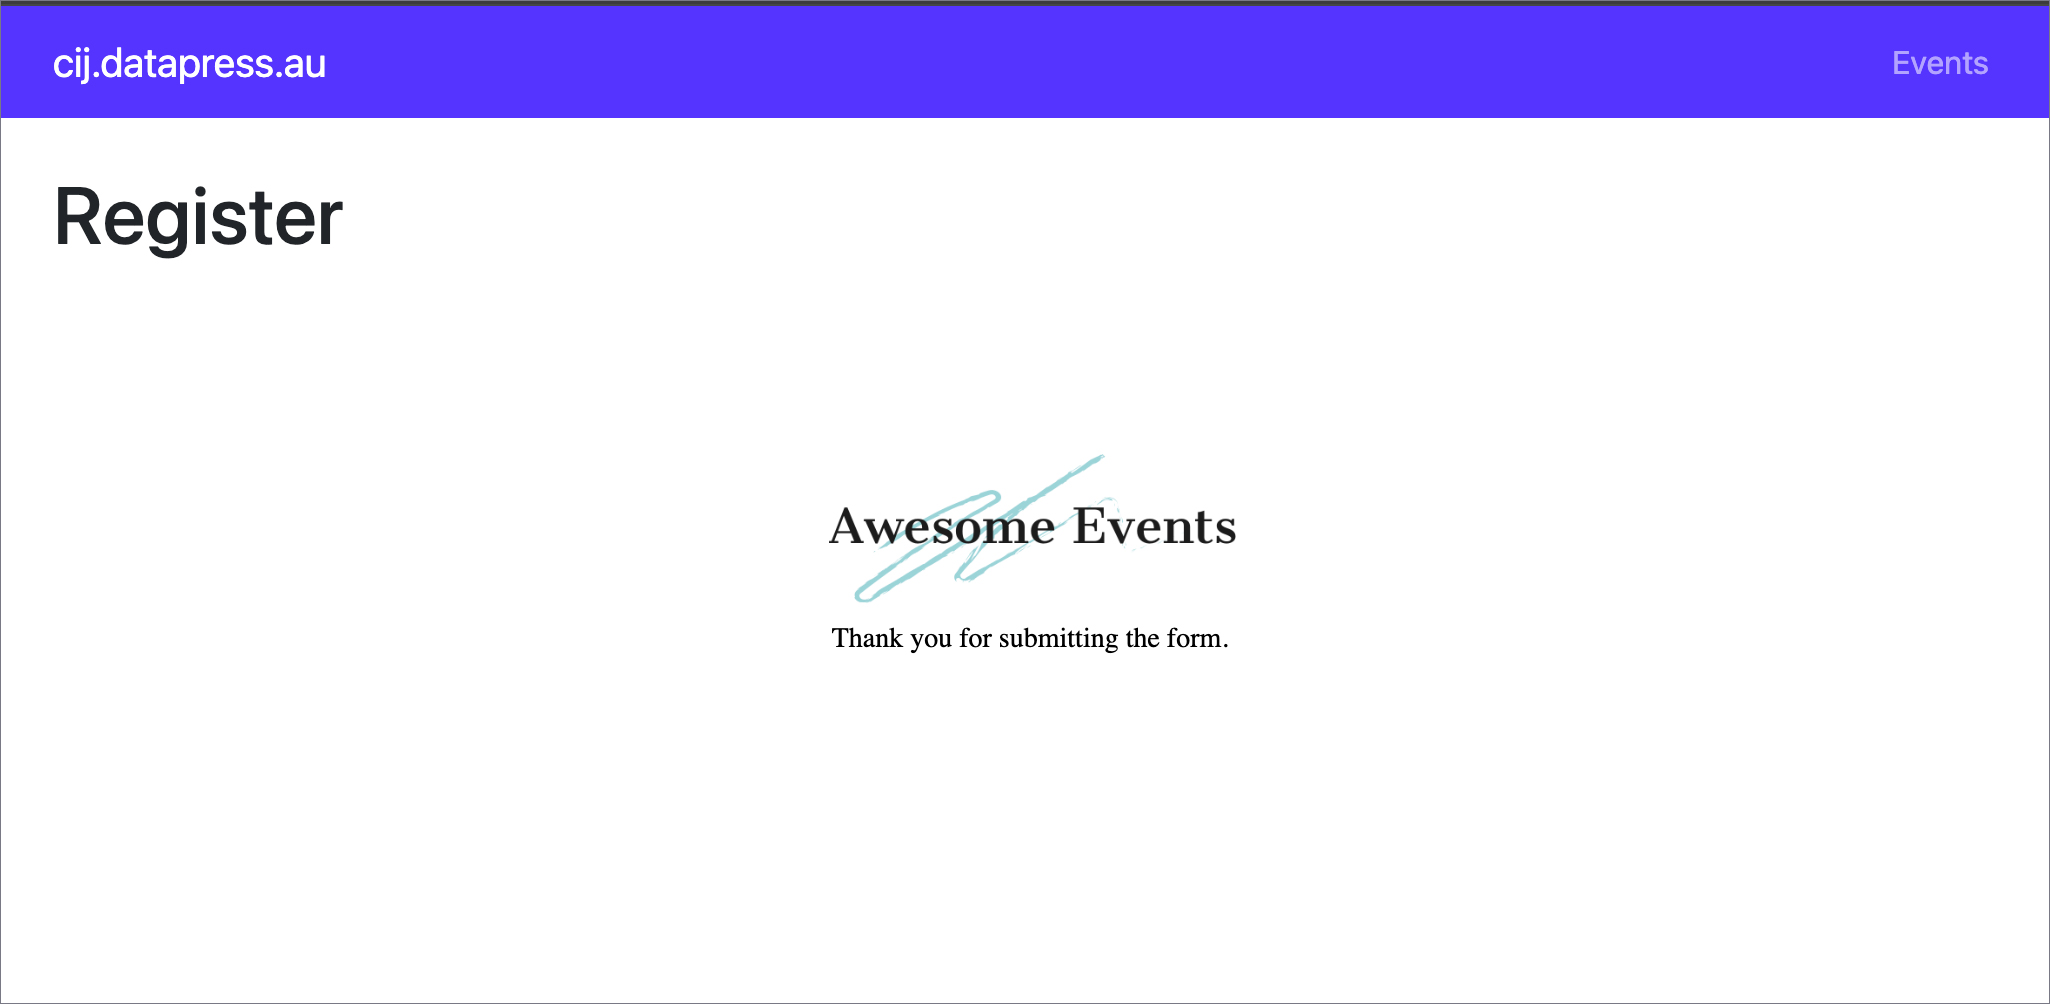
The default success notification after form submission has been updated, and you can customize it with your company logo.
Follow these steps to add your logo:
-
Add your logo to WordPress, for example, to the
public_html/wp-content/uploads/2025/1 -
Go to the Customer Insights - Journeys application Real-time Journeys area -> Forms
-
Open the Anonymous Event Sign-Up Form and edit it. In the ribbon, click the icon </> HTML to open the HTML editor. Under the
<style>tag, find the code below.
div[data-cached-form-url] .onFormSubmittedFeedback .onFormSubmittedFeedbackInternalContainer {
            padding: 30px 0px 30px 1px;
            background: url(/wp-content/uploads/2025/01/site-logo.png) no-repeat center calc(100% - 50px);
            background-size: contain;
            margin: auto;git
        }
- Replace the URL in
background: url(/wp-content/uploads/2025/01/site-logo.png) no-repeat center calc(100% - 50px);with the URL of your logo.
Event Portal Management Table
The solution includes the Event Portal Management table, where you can configure options to modify the look of the site.
Set template/event/formats/date and template/event/formats/time to the required format. By default, the date is set to d.m.Y, which represents 24.11.2024, and the time is set to H:i, which displays 18:30. Set it, for example, to F j, Y to display November 24, 2024.
The template/event/formats/single_date field defines the format for a single-day event. For example, you can set it to display as 25.12.2024 at 11:53–17:00 using the %startDate% at %startTime%–%endTime% value, or as 25.12.2024, time: 11:53–17:00 using the %startDate%, time: %startTime%–%endTime% value, or any other format.
The template/event/formats/range_date field is used to define the format for multi-day events. For example, you can configure how customers see it — 24.11.2024 at 18:30 — 26.11.2024 at 20:30, November 24, 2024, 18:30 – November 26, 2024, 20:30, or another variation — by adjusting the combination of date, time, and range_date.
Some examples of date formatting can be found here.
The next three fields are for keeping placeholder images when the actual picture is missing.
template/event/placeholders/event_image– placeholder for an event picturetemplate/event/placeholders/speaker_image– placeholder for a session speaker's profile imagetemplate/event/placeholders/sponsor_image– placeholder for a sponsor's company logo image
All of them are file-type fields, and you can upload images directly to them.
Setting template/event/view/pagination_limit defines the maximum number of events displayed per page in event listings.
To change any of these settings, go to the Event Portal Management model-driven app and edit the record. For example, to change the speaker's image placeholder to your own:
-
Open the Event Portal Management model-driven app from the DataPress Event Ticketing solution.
-
Edit the
template/event/placeholders/speaker_imagerecord. -
Delete the existing file.
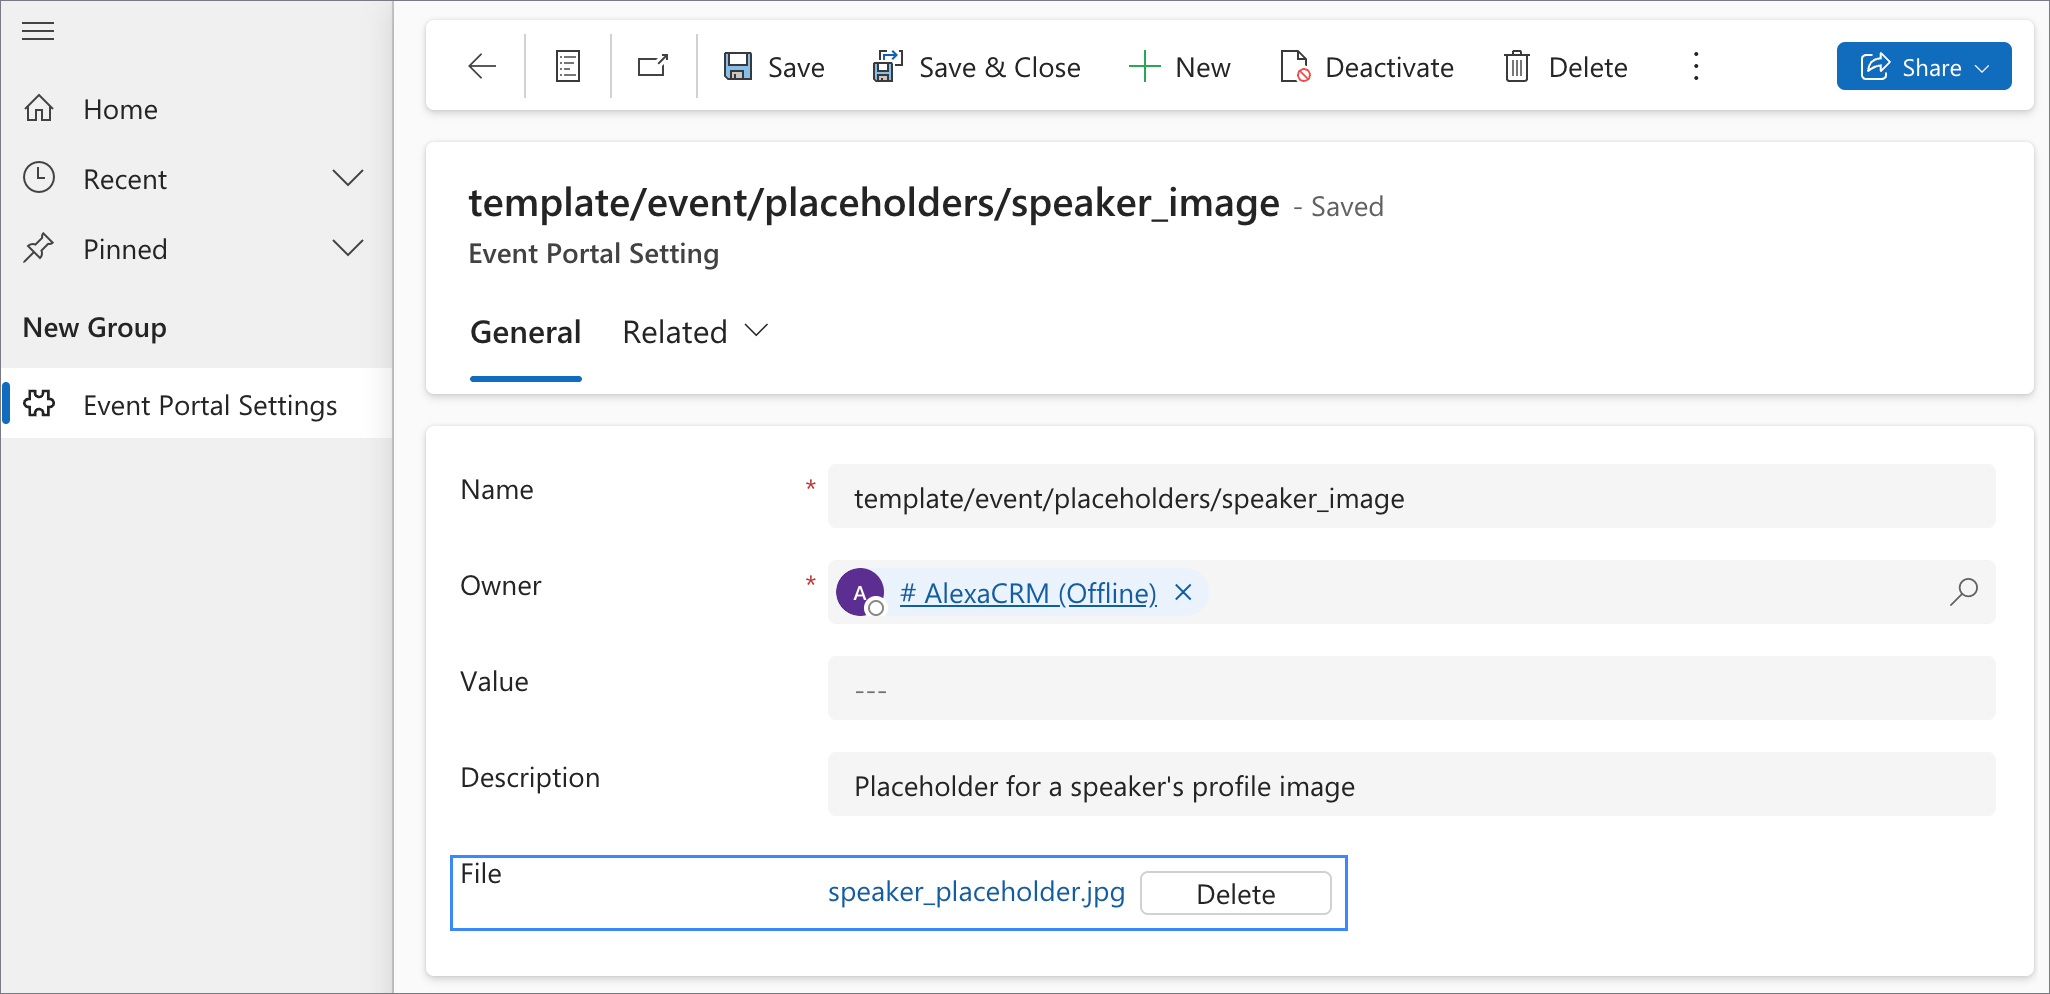
-
Click Choose File and upload your own placeholder.
-
Save the record.