Getting Started
The plugin previously known as Dataverse Integration has been renamed to DataPress.
This change reflects our commitment to enhancing user experience and aligning with our product vision.
All references to Dataverse Integration in the documentation and UI will be updated to DataPress.
Get acquainted with the plugin, learn how to install and configure it properly and learn about its features and capabilities.
Get your Dataverse / Dynamics 365 organization ready
DataPress (Dataverse Integration) is a WordPress plugin that makes WordPress and Dataverse / Dynamics 365 work together. It is not a stand-alone solution.
If you don't have a Dataverse / Dynamics 365 organization yet, you can sign up for a free trial at powerapps.microsoft.com for Dataverse or at trials.dynamics.com for Dynamics 365 trial.
Get the plugin
Enter your WordPress Admin Area and go to Plugins > Add New. Enter "DataPress Integration" into the search box, hit Enter. Locate the plugin, click Install Now, then Activate. Alternatively, go to WordPress.org and download the latest version of the plugin and install it manually.
The minimum required PHP version is 8.2.
The minimum required WordPress version is 6.1.
Additionally, the plug requires the following PHP extensions:
MANDATORY_EXTENSIONS = [
  'curl',
  'dom',
  'intl',
]

RECOMMENDED_EXTENSIONS = [
  'mbstring',
]
Get credentials
Dataverse / Dynamics 365 supports several deployment and authentication scenarios. This tutorial assumes Dataverse / Dynamics 365 Online and Server-to-Server authentication with an application user.
Set authentication keys
If the ICDS_AUTH_KEY is not explicitly defined, it will be generated automatically. However, the ICDS_FORM_AUTH_KEY must be set manually.
Both keys can be updated at any time without disconnecting the integration. For security and compatibility, each key should be at least 32 characters long.
If you define these keys in your site’s wp-config.php file, those values will take precedence over any settings stored in the database.
To verify whether the keys are set:
- Navigate to DataPress → Settings
- Scroll to the bottom of the page to locate the Advanced Settings section
- The current key values will be displayed there
Connect the plugin
Once you got required credentials, it's time to connect the plugin to CRM.
Go to your WordPress Admin Area and access the DataPress menu. Switch to the Connection tab and choose the authentication method. Then follow these steps:
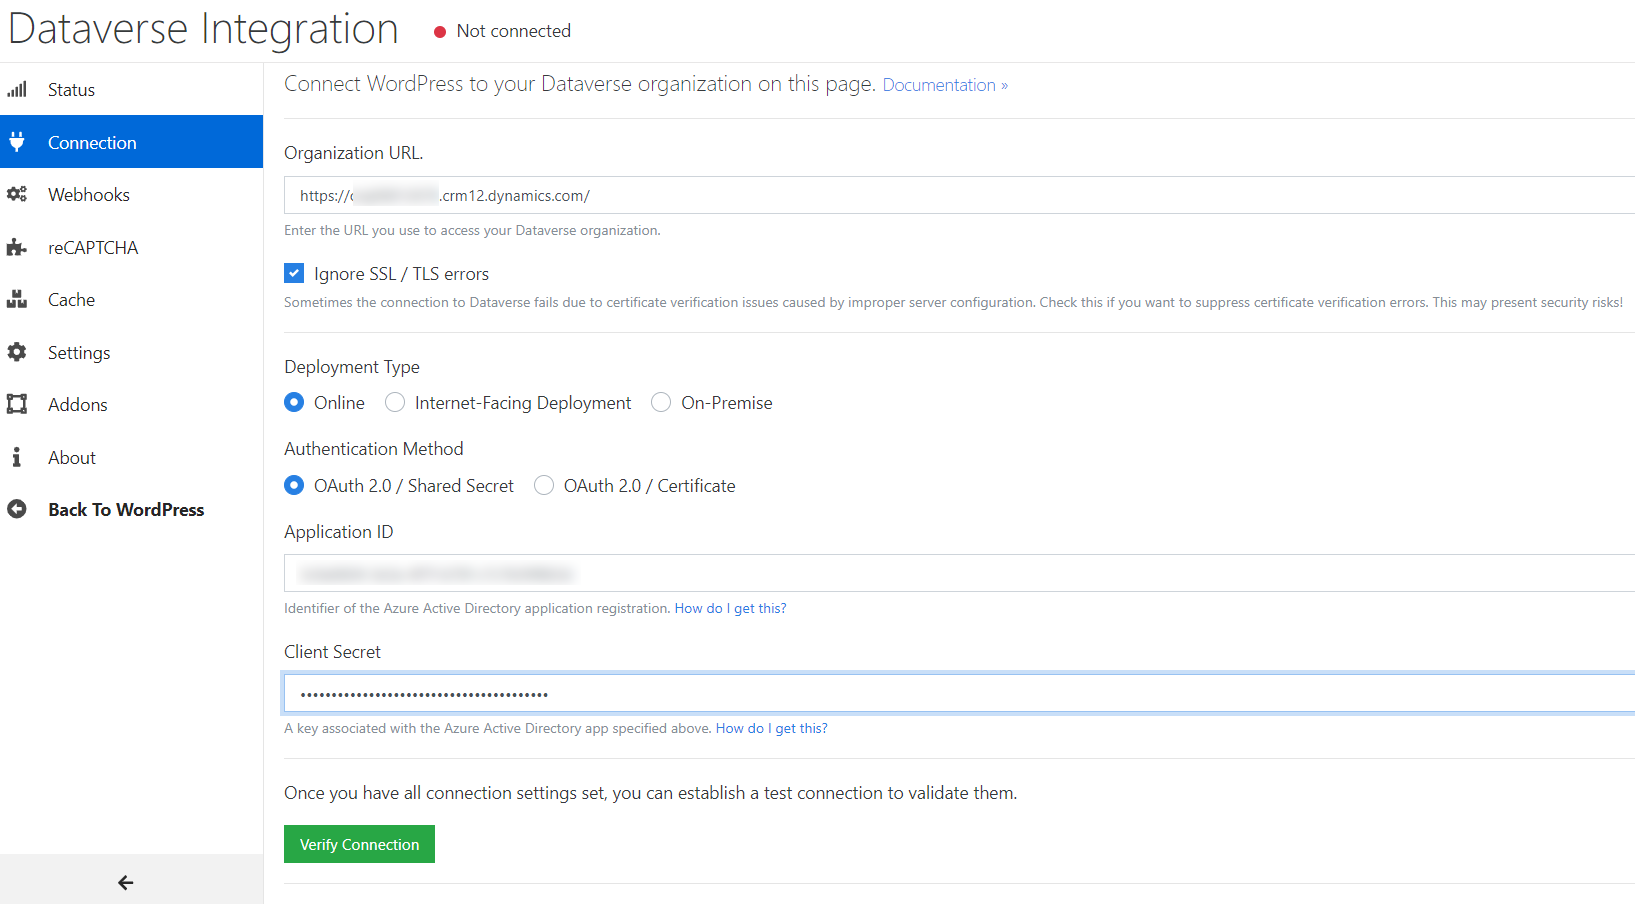
For OAuth 2.0 / Shared Secret authentication method
- Enter the Organization URL -- for example,
https://contoso.crm.dynamics.com - Select the Deployment Type -- Online
- Select the Authentication Method -- OAuth 2.0 / Shared Secret
- Enter the Application ID and Client Secret (from client secret value column) which you set aside previously
- Check whether the credentials are OK by hitting the Verify Connection button
- Upon successful test, click Save settings to establish a connection to CRM
Required Steps After Connection: To enable all features, you must follow this specific order:
- Connection: Verify and Save settings.
- Registration: Go to the Status tab (or click Add registration in the Connection tab). Fill in your Company Name, First Name, Last Name, and Email, then click Register.
- Licensing: Only after the registration is complete, you can provide and activate your license key.
You can monitor your current connection, registration, and license status at any time on the Status tab in the DataPress admin panel.
For OAuth 2.0 / Certificate authentication method
- Enter the Organization URL -- for example,
https://contoso.crm.dynamics.com - Select the Authentication Method -- OAuth 2.0 / Certificate
- Enter the Application ID and Client Secret which you set aside before
- Upload or manually specify the path to the
.pfxcertificate on your hosting server - Enter the passphrase of the certificate
- Check whether the credentials are OK by hitting the Verify Connection button
- Upon successful test, click Save settings to establish a connection to CRM
Now the plugin is connected to CRM, and you can start building the integration.
If you are planning to migrate your website between deployments, make sure to set ICDS_AUTH_KEY in Advanced Settings before connecting the plugin to Dataverse. This key is used to encrypt sensitive information stored in the plugin configuration. If it is not present, the plugin will not be able to automatically reconnect to Dataverse after the migration.
After the site migration, ensure you re-register the site in Dataverse. Multiple site registrations are supported, allowing connections from both the original site and the copy at the same time.
Create a form
The plugin provides a Gutenberg block, "Dataverse Plain". To create your first form, you can use the custom form syntax.
Install Premium Features
Premium feature! This feature is available in the premium extension.
Install WordPress Premium Solution
- Sign in into WordPress as an administrator.
- In the left-hand navigation menu, select DataPress.
- Navigate to the Extensions tab.
- Locate and download the DataPress Integration Premium package.
- Click Back to WordPress to return to the main dashboard.
- Go to Plugins → Add New Plugin, then upload the downloaded
.zipfile.
Alternatively, you can download the premium plugin directly from the Plugins tab in the WordPress admin area.
Important Notice about DataPress 2.85 and Later
Starting from version 2.85, the DataPress admin interface has been significantly updated. To ensure your experience matches the instructions in this documentation, please make sure you have updated the DataPress plugin to version 2.85 or higher.
If you are using an older version, the interface and available features may differ, resulting in a mismatch with the documented steps.
All addon functionality is now built into the premium plugin.
You can manage all extensions directly in the Extensions tab. From the Registered extensions section, you can enable or disable individual addons as needed.
Configure DataPress Solution or click Add registration in DataPress Admin Panel (Connection tab)
To configure the solution, you can either:
Open the DataPress Admin Panel, go to the Connection tab, and click Add Registration, or follow the manual steps outlined below.
Once the connection is configured, proceed to the Status tab to complete your registration:
- Enter your Company Name, First Name, Last Name, and Email
- Click Register If you already have a registration, you can skip this step.