Configuration
Configuration of the plugin is performed in the WordPress Administration panel. The plugin provides a separate section for that, which is called "Dynamics CRM". You can locate it in the main navigation menu on the left side of the screen.
Initial configuration
The plugins encrypts stored Dynamics 365 credentials. You must specify a PHP constant WPCRM_KEY in wp-config.php in order for the plugin to work correctly.
The WPCRM_KEY value must be a base64-encoded AES-256 key. You can generate one yourself, or use one of the online services, e.g. [http://www.digitalsanctuary.com/aes-key-generator.php].
Connection
Microsoft Dynamics CRM supports two security models for authentication: claims-based authentication and Active Directory authentication. The type of authentication used depends on the type of deployment your application is accessing: Microsoft Dynamics 365 or Microsoft Dynamics CRM. CRM Plugin supports both CRM Online (Deployment type: Office 365) and CRM on-premises deployment (Internet-Facing Deployment).
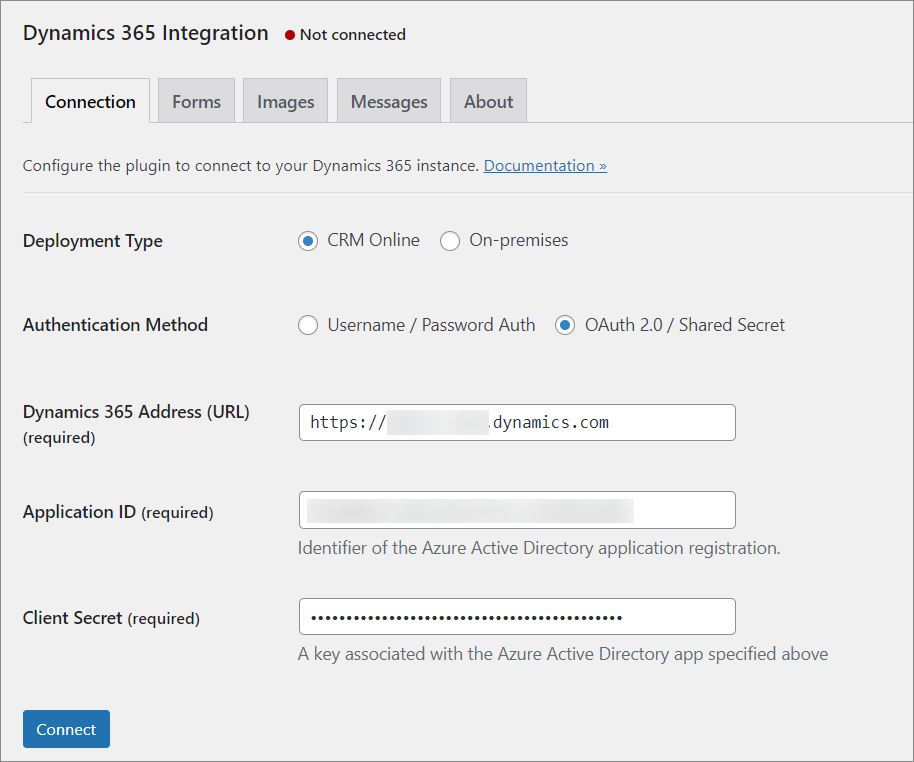
Deployment type
: Internet Facing (On-premises) or CRM Online (Office 365). If your CRM domain is *.dynamics.com then you are using CRM Online. Otherwise choose On-premises.
Dynamics CRM Address
: Absolute URL to your Microsoft Dynamics CRM, e. g. https://contoso.crm.dynamics.com for CRM Online, or https://crm.example.net for the on-premises deployment.
Application ID : Microsoft Entra ID application registration identifier. The app user mapped to this registration will be used to authenticate and access the CRM data, please ensure that the user has sufficient permissions to access Dynamics CRM.
Client Secret Application registration secret as defined in Microsoft Entra ID. Make sure the secret has not expired.
Step-by-step instructions how to create app id and secret are available in this knowledge base article.
Using the exact specified STS URL
TL;DR: Check this box if you are using federated authentication and running into connection problems.
For Online deployments you may notice another setting, Federated login only: use the exact specified STS URL. In scenarios with federated authentication, the plugin first makes a request to Microsoft Entra ID to determine the federated STS URL. Most commonly it points to the UsernameMixed endpoint in ADFS.
However, in some cases an unsupported ADFS endpoint may be specified by Microsoft Entra ID, or non-ADFS integration may be employed. The default behavior for the plugin is to use the specified domain and the hard-coded endpoint, /adfs/services/trust/13/usernamemixed.
When a non-ADFS solution is employed, or ADFS is being used in a non-supported way, such behavior may actually make things worse. For that reason, please check this box to make the plugin use the exact STS URL as reported by Microsoft Entra ID.
Portal
Premium feature! This feature is available in the addon to the premium extension.
Delete Unlinked Users removes all CRM-managed WordPress users which do not have a corresponding WP Identity record in CRM. Useful if you have deleted a lot of WP Identity records or user names were changed.
In the Login Settings section, you can configure the entity to bind users to. Contact is the default entity.
Check Authenticate new users against Dynamics CRM by default if you want newly created WordPress users to be automatically authenticated against Dynamics CRM.
Registration
Premium feature! This feature is available in the premium extension.
This tab provides extra options for the [msdyncrm_registration] shortcode.
Configure these options to show a CRM form instead of the default registration form.
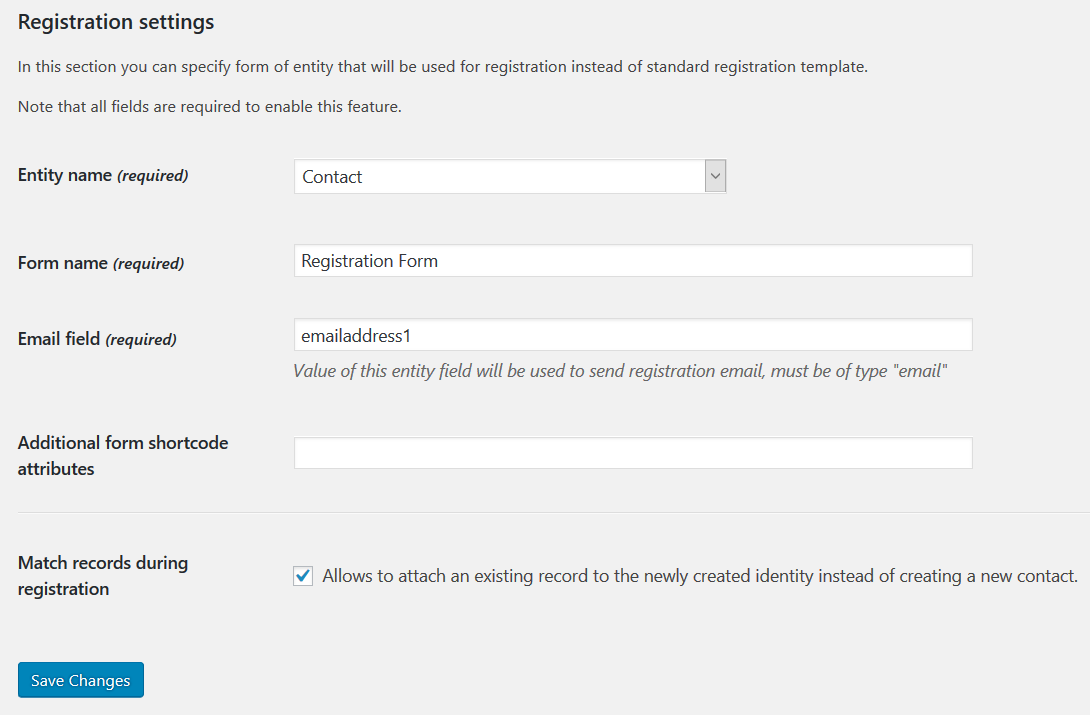
Pick the entity -- it should be the same entity chosen on the Portal tab in the Login Settings section. Specify the form you want to use in the Form name field, enter the name of the attribute to use as user name in Email field. Additional form parameters may be configured in the Additional form shortcode attributes field -- see Forms.
Check Match records during registration if you want to reuse existing records (e.g. contacts) with matching email addresses. It will create new records every time if unchecked.
Roles
Premium feature! This feature is available in the premium extension.
The plugin will ask you to install default identity roles in CRM to provide role management for CRM-managed users. Click Install Default Roles to do that.
After identity roles are in place, you can configure mapping of identity roles to WordPress roles. Map unused identity roles to None.
Forms
Enable and configure reCAPTCHA in forms using the Forms tab.
Messages
In the Messages section you can configure various messages that the plugin prints out on the web site.
About
You can configure the logging verbosity on the About tab.
Premium feature! This feature is available in the premium extension.
To install the license for the premium add-on, pick your edition (Pro, Business, Enterprise) and enter the license key. Click the Activate button.