Elementor
Build your forms and write custom twig code using Elementor!
Introduction
This is a premium feature. For more details see Premium Edition.
Our plugin supports Elementor. We offer several widgets that are compatible with Elementor (including Elementor Pro). To edit a form using Elementor, you need to install and activate the DataPress Integration Premium plugin.
You may also need to install and activate Elementor Pro.
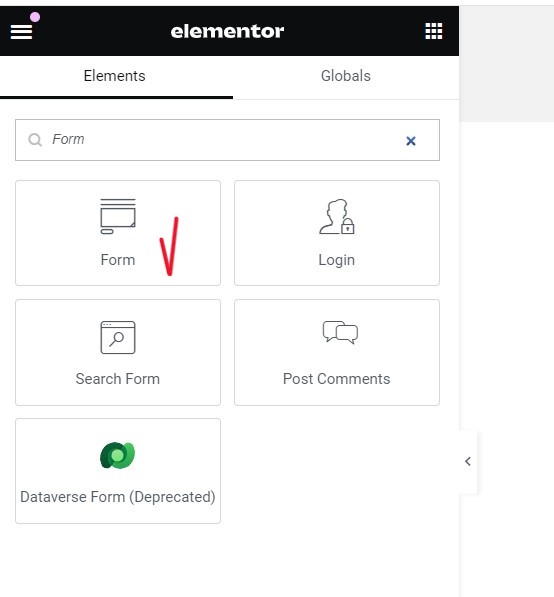
Form widget
Steps to Create a Form
Widget Name - Form
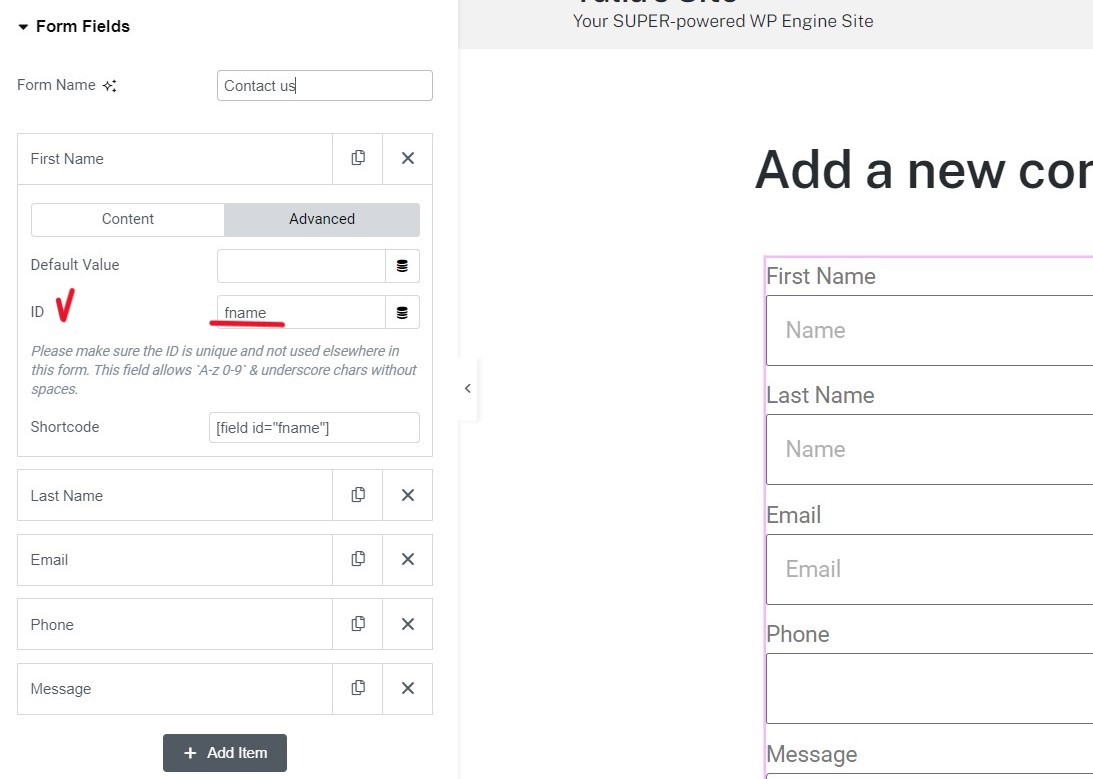
- Add the Form Widget. Drag the Form widget into the content area, create the necessary fields, and save their IDs.
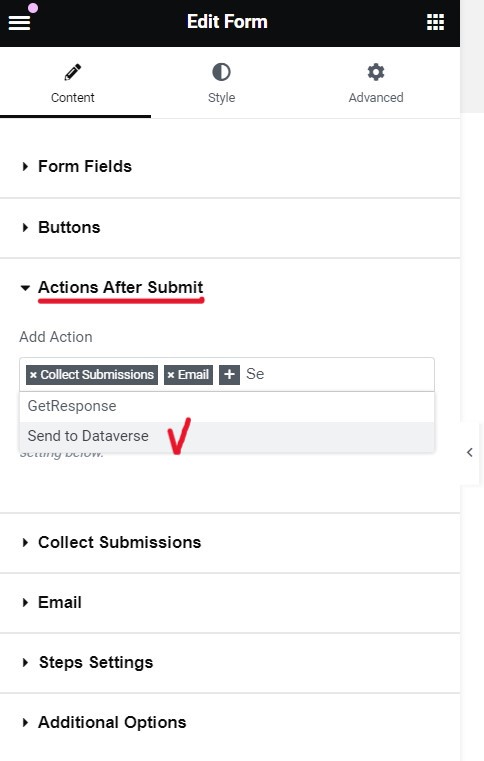
- Configure Actions After Submit
Navigate to Actions After Submit.
Click + and add the Send to Dataverse action.
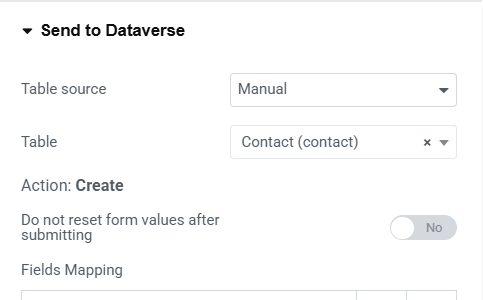
- Set Up Binding There are two binding configuration options available:
3.1 Manual binding
- Set the Table source to Manual.
- Select the table you want to use.
- Only the create action is available in this mode.
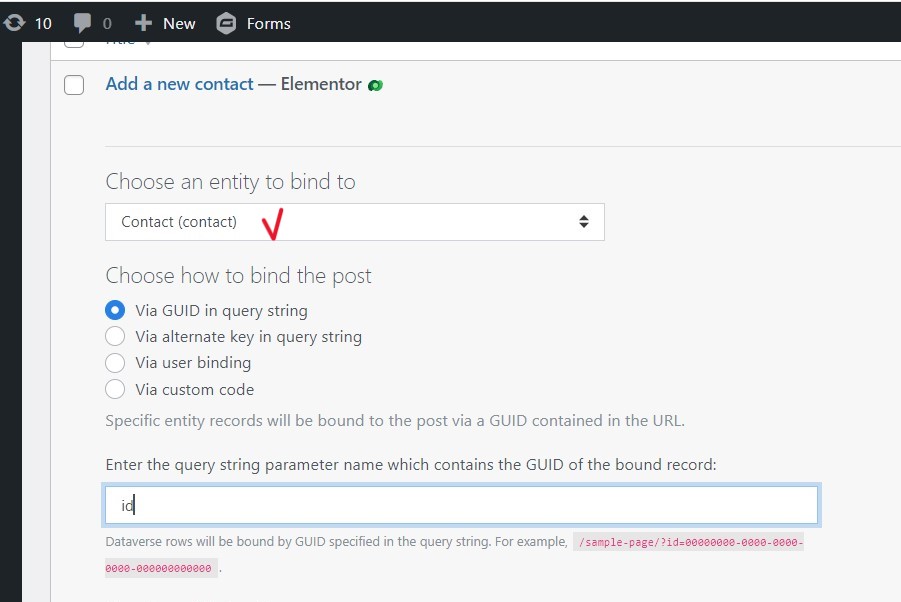
3.2 Page Binding Configuration
- Save the form and navigate to Pages → All Pages.
- Find the page, click Configure Binding, and select a table for new records.
-
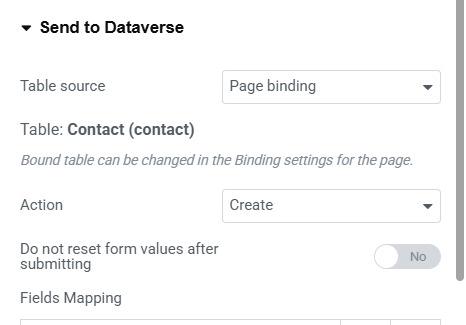
Open the page in Edit with Elementor mode and select Send to Dataverse. The chosen table will be displayed in the Table dropdown.
-
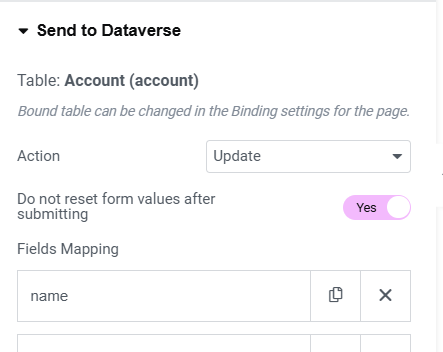
Choose an action (create, update).
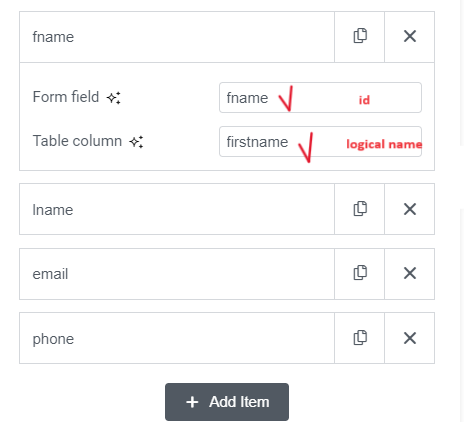
- Map Fields
Once the action is selected, configure the necessary field mappings:
- Click
+ADD ITEM. - Define the Form field (the previously saved field ID) and the Table column (the logical name of the column) for each field.
To ensure updated field values are displayed after submission, set the Do not reset form values after submitting option to Yes.
How to create a field for a lookup column
Steps:
-
Add a new field and set its type to Dataverse Lookup.
-
Specify the corresponding table and view.

- Map this field with the column logical name in the Send to Dataverse action.
How to create a field for a Date Time column
To create a field for a Date Time column, follow these steps:
- Add Two Fields:
- Date Field: Create a field specifically for the date.
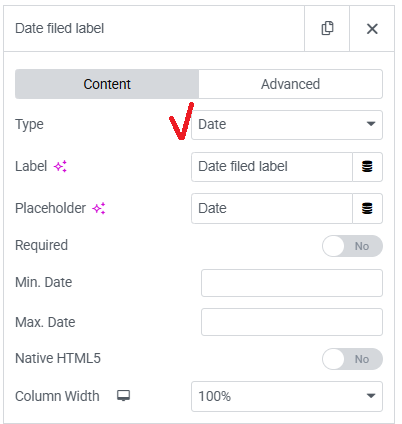
- Time Field: Create another field specifically for the time.
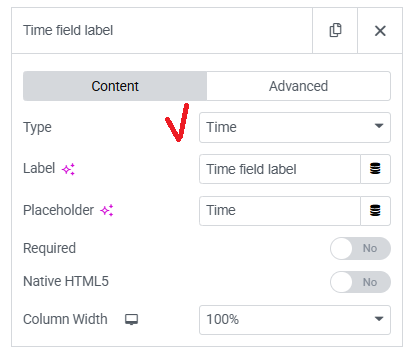
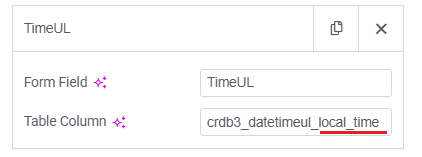
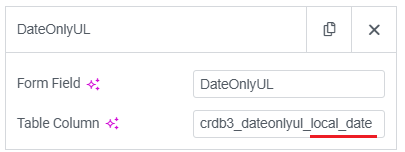
- In the Send to Dataverse section:
-
Assign the same column logical name for both the date and time fields.
-
Use appropriate postfixes such as _local_date, _local_time, _utc_date, or _utc_time to manage timezone adjustments.
DataPress Admin Area Settings:
Adjust the ICDS_DATETIME_VALUE setting with options like:
- Legacy
- UTC
- Local
Examples for the createdon column which has User Local behavior:
| Legacy | UTC | Local | |
|---|---|---|---|
createdon_utc_date | UTC | UTC | UTC |
createdon_utc_time | UTC | UTC | UTC |
createdon_local_date | convert the date to the user's timezone | convert the date to the user's timezone | convert the date to the user's timezone |
createdon_local_time | convert the time to the user's timezone | convert the time to the user's timezone | convert the time to the user's timezone |
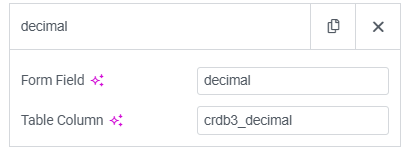
How to create a field for a Decimal or Float Column
Steps:
- Add the Dataverse Number Field:
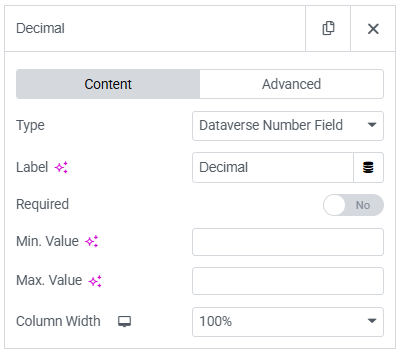
- Configure column logical name:
In the Send to Dataverse section:
- Set the column logical name in the Table column.
- Specify the field ID in the Form field.
How to create a field for a Choice Column
Example: You have a choice field with day options.
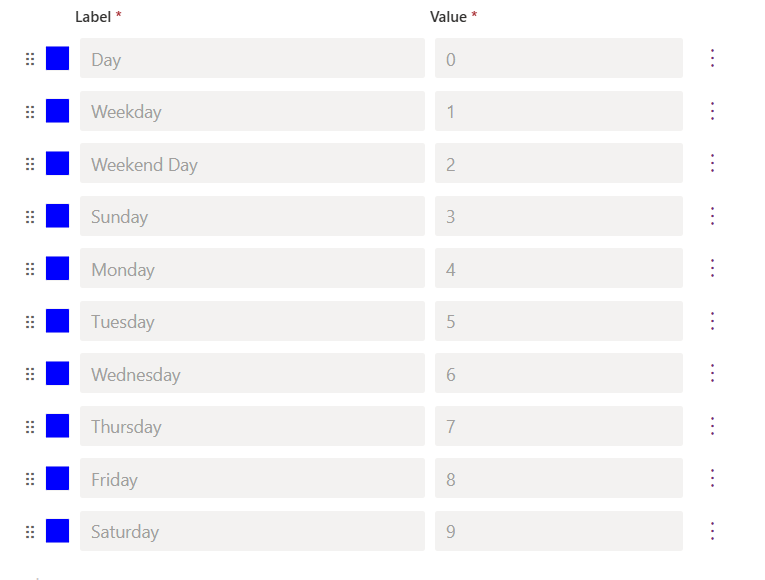
Steps:
- Create a Select Field:
Set the options in the format label|value as shown in the image below.
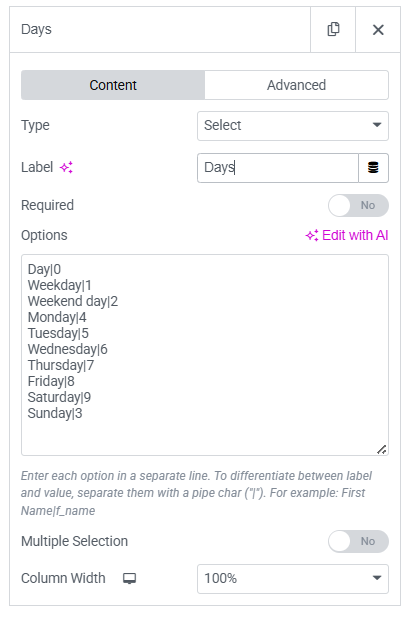
- Configure the column logical name in the Send to Dataverse section:
- Set the column logical name in the Table column.
- Specify the field ID in the Form field.
Twig widget
Widget Name - Twig Template
Category - Dataverse
Description: A simple and visual widget. Write your twig code and you will immediately see the generated content in the content area.
Field widget
Widget Name - Dataverse Field
Category - Dataverse
Description: To use this feature, simply select a table and then choose a column from that table which you wish to display.
Dynamic tags
One of the simplest methods to display a field value for any record is by using dynamic tags. First, configure the binding for the page by selecting a table and the binding method. Then, return to page editing and, in the Elementor Text Editor widget, click the Dynamic Tags button (symbolized by a coins icon). Next, select the 'Dynamic field' option and click the settings button. Now, you can choose any field from which to display a record value.
Date Time fields in the Dataverse field widget
You can see several options for Date Time and Date Only fields. For example, if we have a Date Time value of 2025-10-01T21:00:00Z, the field will display the following values for a user in the UTC -4h timezone:
- Column Name Only: 2025-10-01T21:00:00Z (No timezone conversion)
- Column Name + Local DateTime: 2025-10-01T17:00:00 -04:00 (Timezone conversion according to the user’s timezone)
- Column Name + Local Date: 2025-10-01 (Date part only, converted to the user’s timezone)
- Column Name + Local Time: 17:00:00 (Time part only, converted to the user’s timezone)
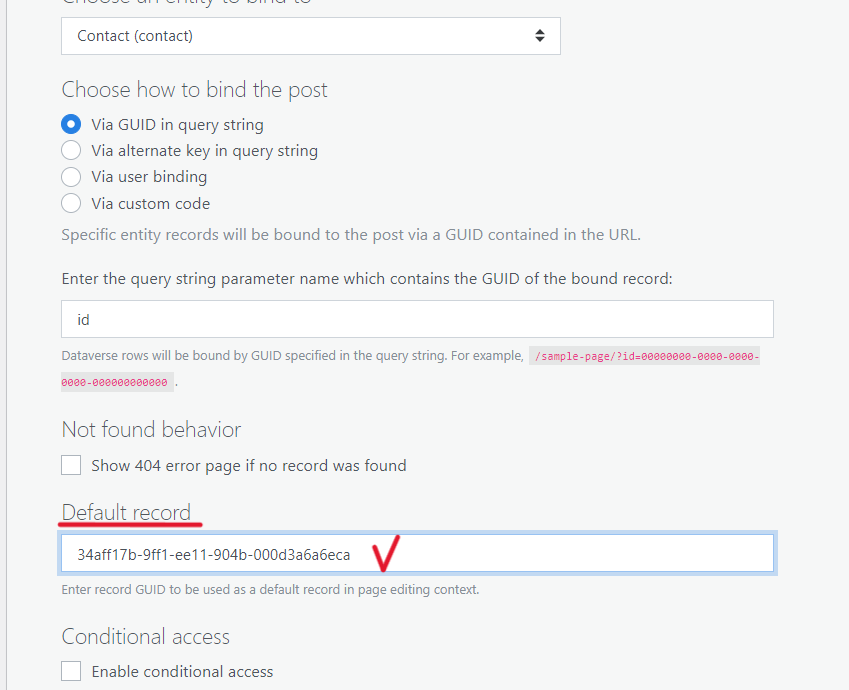
Default record in editing mode
You can enter a record GUID to be used as the default record in the page editing context. Simply find the page, click Configure Binding, select a table and enter an id in the Default record textbox.
Troubleshooting: Updated Records Not Reflected in Forms
In some cases, you can successfully update a record, but the updated values do not appear in the Elementor form afterward. As one of the possible solutions, you can disable Elementor's internal caching (it may contain outdated form data).
You may also need to manually clear Elementor’s cache:
- Go to Elementor → Tools
- Click Regenerate CSS and Clear Cache
These steps ensure that updated record values are properly reflected in the form and that dynamic field mappings work as expected.